Arisha's Inspiration Corner
A little blog to share crafts, recipes and ideas with you x
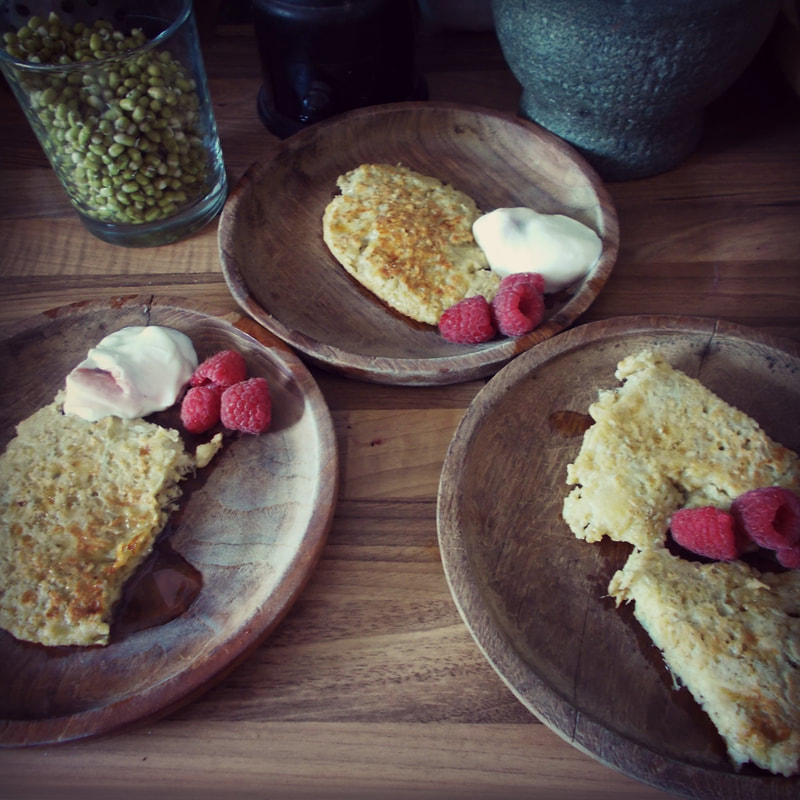
These scrumptious pancakes make a yummy and nutritious breakfast for the whole family, and they are so quick and easy to prepare too! I have included the basic three ingredient version, but you can add in whatever you like, for example, raw cacao powder, super foods such as maca, blueberries, nuts, dried fruit... the list goes on!
These also make a great afternoon snack for hungry children (and parents!) Makes 6 mini pancakes or 2 full sized ones. INGREDIENTS: 2 bananas mashed 2 eggs 1 cup oats WHAT TO DO: - Mash the bananas in a bowl, crack eggs in and mix in oats - Mix thoroughly till you have a thickish batter - Heat some coconut oil in a frying pan and pour 3 mini pancake sized blobs into the pan - Fry gently till golden then flip and brown the other sides - Serve drizzled in maple syrup or honey with a blob of live yogurt and a few raspberries -Repeat with second half of batter -Enjoy!
0 Comments
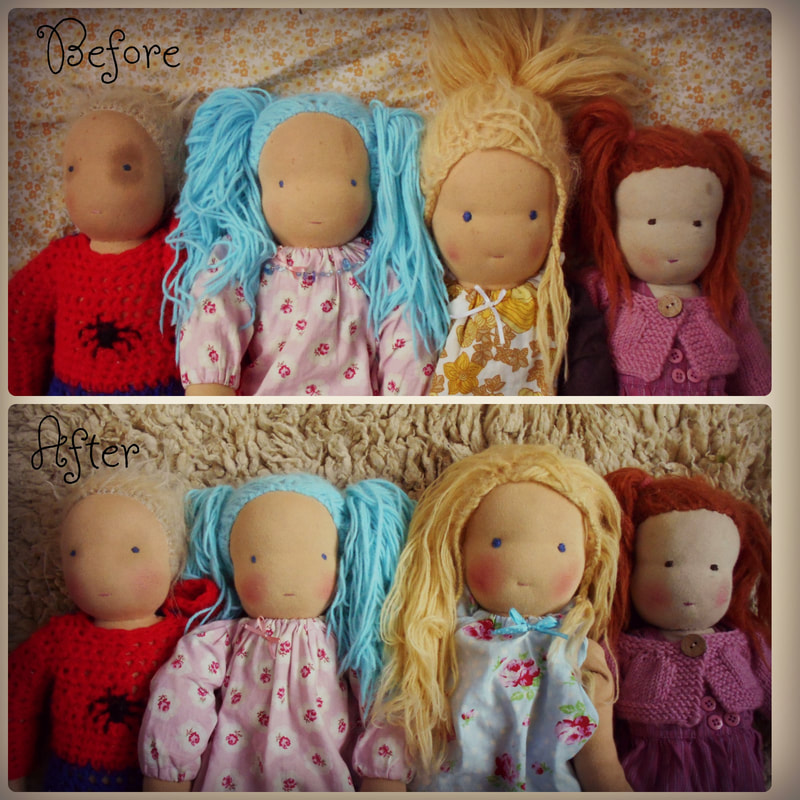
I have been meaning to post this tutorial for a while now, so finally, here it is. Being a maker of Waldorf dolls, we have rather an abundance of them around the house, and as they get played with so much, they get pretty grubby, ( just like their little Mamas and Papas! ) We use a mild eco washing up liquid, but any mild castille or liquid soap would do. This is a lovely activity to do with your children, and teaches them how to care for and keep their babies clean too. We tend to spot clean ours. I know some people submerge their dolls completely, but I think unless the doll is truly filthy, a spot clean usually does the trick!
WHAT YOU NEED: - mild liquid soap/ eco washing up liquid - old toothbrush - basin of warm water - Red beeswax crayon - rag WHAT TO DO: - Lay your dolly down and wet the toothbrush in the water. Squeeze a little soap onto the brush and brush gently in one direction over the area to clean. Try not to get the doll too wet while doing this. - Keep wetting the brush and gently go over the whole dirty area - Now wet the brush again and go over the whole area wetting and brushing gently in the same direction. - Dab dry with rag and go over again if still a bit soapy. - Reshape if needed - Leave to dry for at least 24 hours - If you have washed your doll's face, you will need to reapply the cheek rouge. Once completely dry, take your rag and rub it on the red beeswax crayon. Rub the waxed area onto the cheeks till you get the desired rosy-ness. You can build this up in layers if you want a redder cheek. Make sure to wait until the face is completely dry before rouging. 
This recipe gives you a really nutritious, healthy snack that is very fast to put together, and tastes divine! You can vary the ingredients depending on what you have to hand and even substitute the nuts for seeds such as sunflower seeds if you do not eat nuts. The kids love them too! You can always sneak a few super foods in too for an extra nutritional boost!
WHAT YOU NEED: - 1 cup pecan nuts - 1/2 cup ground almonds - 2 tblsp ground flaxseed - 1 cup soft pitted dates - 1/2 cup coconut butter, melted WHAT TO DO: - Put all the nuts into a food processor and blend well - Add dates and flaxseed and blend again - Turn mixture out into a bowl and add in coconut butter - Mix by hand, squeezing into a dough. If dough is too crumbly, add in a little more coconut butter - Fill a silicone ice cube tray with the mixture, packing down firmly - Refrigerate for a couple of hours before eating so the coconut butter has a chance to set 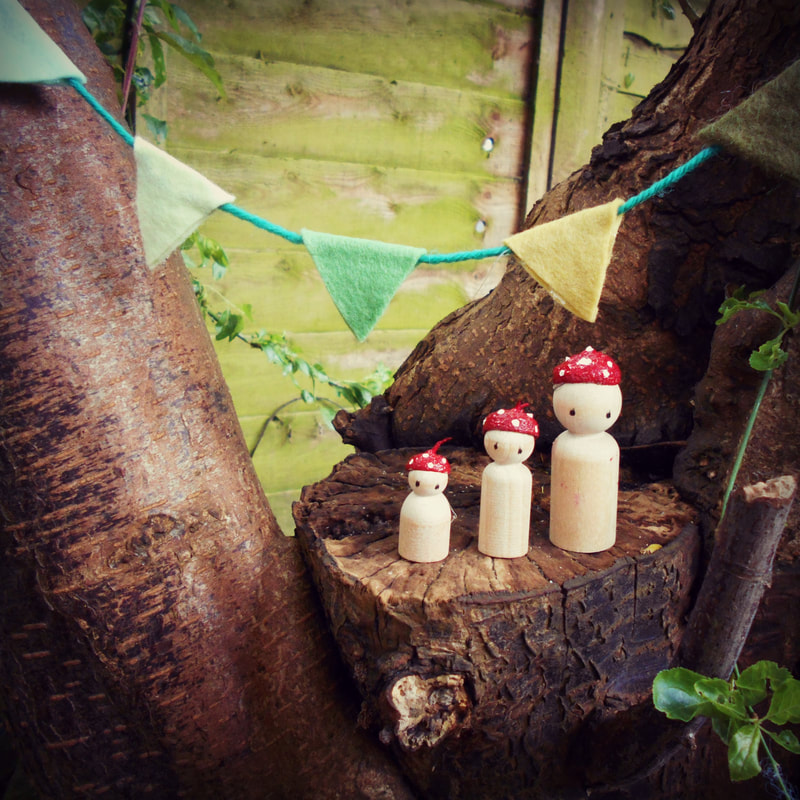
These sweet little peg dolls are so simple to make, and fun for all ages to play with too! We keep a small basket of natural treasures like pine cones, conkers, acorns, crystals and shells, and these little guys live in there with them for hours of creative play. The fairy bunting can be used outdoors for a fairy garden or in a doll's house indoors. I made a rainbow bunting for my daughter's doll's house and it looks super cute strung across the dolly bedroom! This is also a great way to use up small felt scraps too. WHAT YOU NEED: - wooden peg dolls - acrylic paints, red, white and black - non toxic varnish - Acorn cups - small pieces of felt - piece of wool or string - hot glue gun WHAT TO DO: - First glue the acorn caps onto the peg dolls heads - When the glue has cooled, paint the acorn caps red - When the red is dry paint on small white spots and a pair of black eyes. - Once that is dry, seal the whole thing with a coat of non toxic varnish - Now for the fairy bunting... Cut out a small diamond shape of each colour you are using. - Line them up as close together as you want them and lay your wool/ string across the centre's of them all - Carefully using the hot glue gun, glue on on side of the diamond and fold the sides together over the wool. - Do the same with each flag till they are all glued in a row along the wool. - Now hang them up somewhere pretty and wait for the fairies to find them! 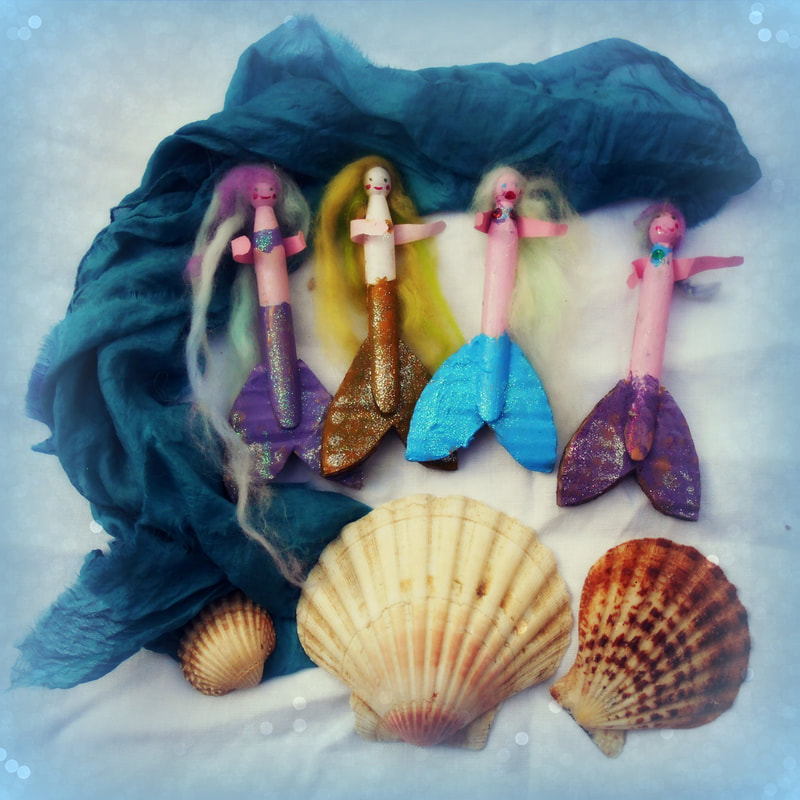
This is such a fun craft to do with your little ones. Who doesn't love mermaids! They are really easy, and the creative possibilities are endless! My daughter and I made these together for a mermaid project she was doing , and they have been played with a lot since then, along with a basket of shells we keep on the shelf.
WHAT YOU WILL NEED: - wooden dolly pegs (You can get these at your local hard ware store or on ebay) - acrylic paints -Thick card board (for the tails) - skin coloured paper (for the arms) - wool roving (for the hair) - glitter -hot glue gun or pva glue WHAT TO DO: - Cut out the pointed heart shaped tail shapes from the thick cardboard and slide them into place in the bottom of the dolly pegs - Now paint the skin and tails of your mermaids and glitter liberally - Once the paint is dry, paint on the face details, and bikini shells or tops - Now cut out arm shapes and carefully glue onto the back of the peg - Take a long chunk of wool roving and glue to the head. - Leave to dry 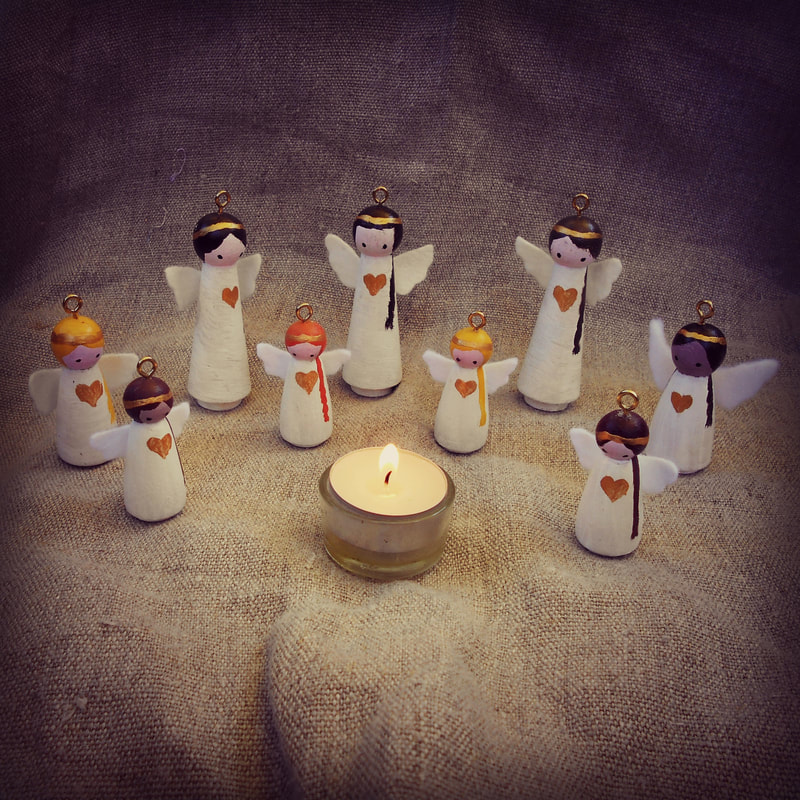
It is tradition in our house to always make our own Christmas tree decorations, I treasure the ones the children have made and I love getting them out each year. This year we are making wooden peg doll angels, they are super easy and everyone can join in!
WHAT YOU NEED: - wooden peg dolls ( I found mine on ebay) - acrylic paints - White wool felt - Tiny brass screw in hoops - Non toxic varnish (optional) - Hot glue gun WHAT TO DO: -First, paint the bodies white, or whatever colour you want your angels to be - Next paint the face and hairstyle - When that is all dry, paint a gold halo on the heads, and if you like, a gold heart on the chest. - When paint is dry, varnish with the non toxic varnish - Cut out some wing shapes from the felt and using the hot glue gun, glue to the back. - Finally, screw a little brass hoop into the top of the head so you can hook her onto the Christmas tree - Voila! Happy making and Merry Christmas! 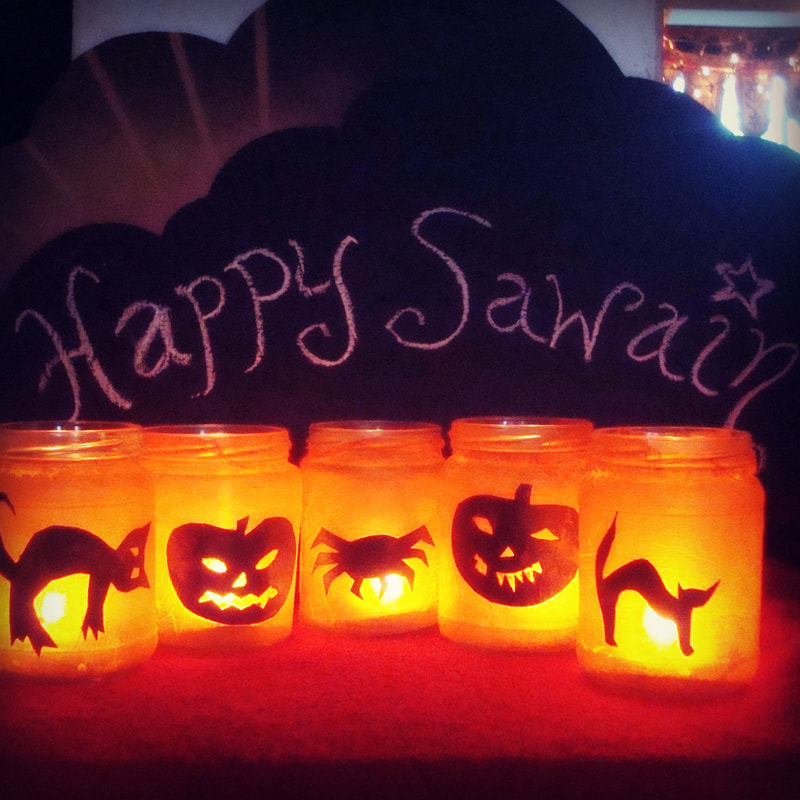
My kids and I had a great time making these lanterns! It is a little bit of a sticky craft, but lots of fun! These look fantastic ranged around your pumpkin lantern, or as a centre piece for your table.
WHAT YOU NEED: - some clean jam jars with labels taken off - orange tissue paper - dark coloured paper - PVA glue - candle nightlights or battery powered nightlights WHAT TO DO: - Draw spooky Halloween shapes on your dark paper , make sure they are the right size for your jars - Cut out said shapes - lather PVA glue all over your jar - Stick the dark shapes onto the jars, then put more glue over the tops of them too - Cut strips of orange tissue paper to fit around the jars - Carefully wrap the tissue paper round the jars, smoothing gently as you go. - Add more glue to stick the end piece onto itself - Finally paint another layer of glue over the entire jar to act as a kind of varnish - Allow time to dry, then place a nightlight inside each jar and enjoy the beautiful warm glow these lanterns give! - Happy Halloween! 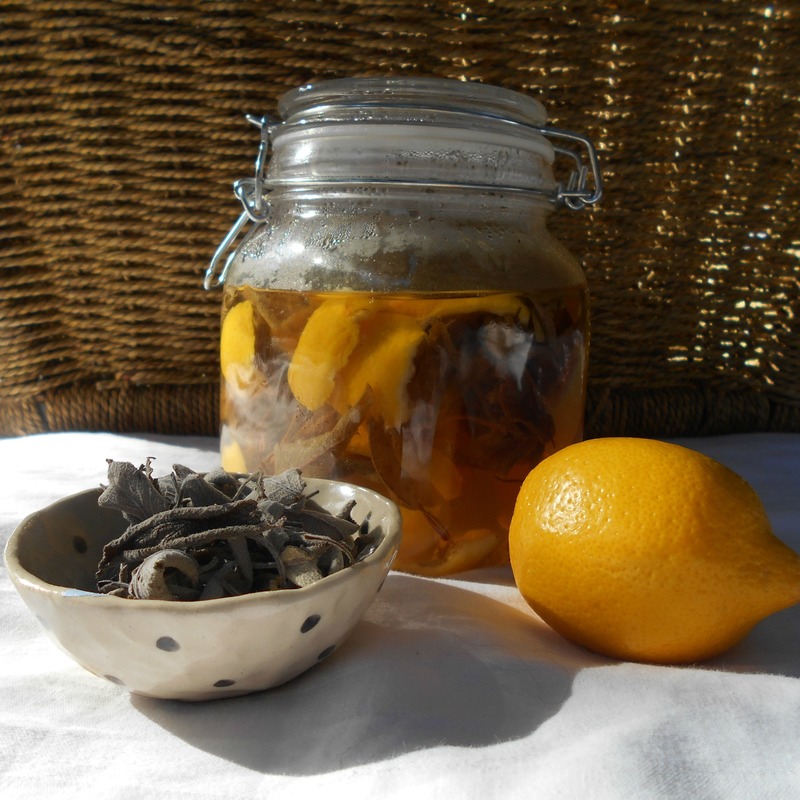
I have been intending to make some of this cleaning vinegar for ages now, and finally got some together, so I am sharing the recipe for all to enjoy! I used lemon and sage, but the combinations you could use are endless. Next time, I plan on trying orange and rose petal or lime and rosemary! This is such a gorgeous natural cleaner, that you can use all over your house, especially in the kitchen and bathroom. It is easy to make, cheap, natural and smells fantastic, plus you get that great feeling from making something wonderful and useful yourself!
WHAT YOU NEED: - Glass jar - White vinegar - citrus peel - Fresh herbs or flower petals WHAT TO DO: - First wash and dry your glass jar - Part fill the jar with your citrus peel and herbs (I have used lemon and sage) - Heat the white vinegar to almost boiling - Pour vinegar over lemon and sage and seal the jar - Place jar in a dark cool place for approx 24 hours ( longer if you want a stronger scent) - Strain the herbs and peels out and discard, put vinegar back into jar to store - To use simply wipe surfaces with equal parts water and vinegar mixture, or make up a spray bottle with 1/3 vinegar and 2/3 water for an all purpose cleaner! 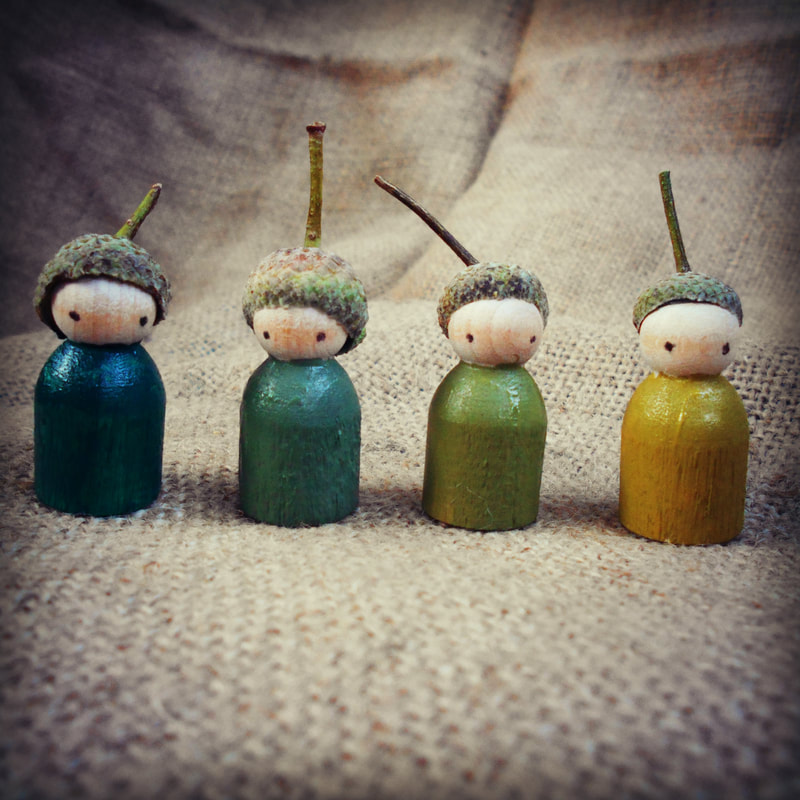
I love the concept of the nature table, to help children understand the turn of the seasons and the bounty of nature in all her abundance! I have created these little acorn peg dolls as we are just beginning to feel Autumn in the air here in the UK now, and I thought they would be grand for our little seasonal table, plus, well, any excuse to make wooden peg doll friends really! My daughter made these with me and she and her little brother have had hours of fun playing with them already! We painted ours in varying shades of green, but autumnal orange and brown colours would work well too.
WHAT YOU WILL NEED: - Some tiny wooden peg dolls approx 3cm tall ( I bought mine on ebay) - Acorn caps - acrylic paints - non toxic varnish - Hot glue gun WHAT TO DO: - Decide which dolls each acorn cap will go on and using the hot glue gun, put a generous blob of glue on the head and stick on the cap. Repeat till they are all done - Next, paint the bodies in acrylic paint of varying shades and paint on two little dots for eyes - Once dry, put on a coat of non toxic varnish- That's it!!! 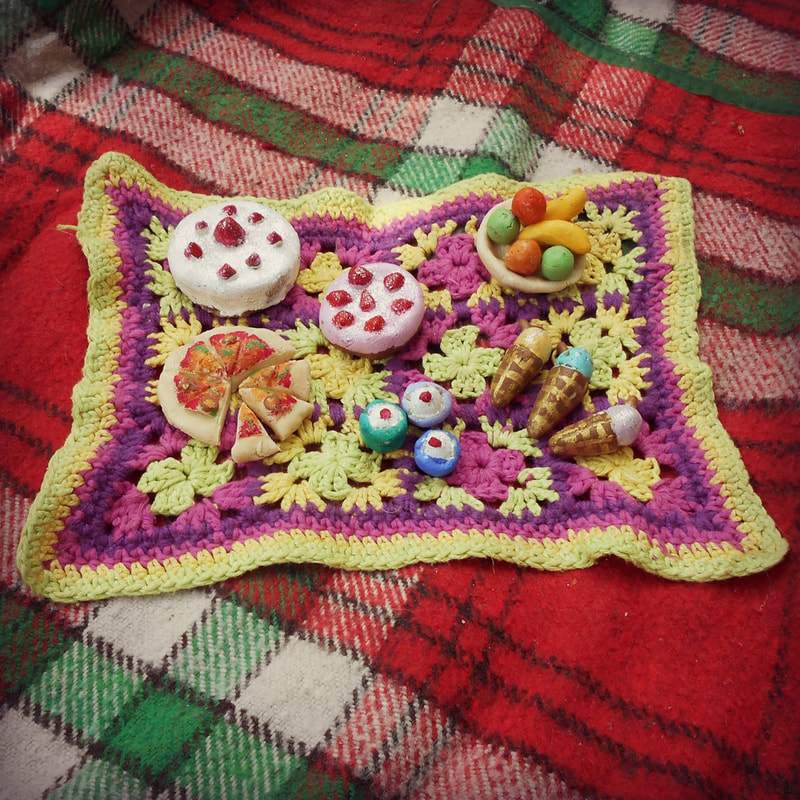
I confess, I think I had more fun making this than my children! There is something so soothing and timeless about rolling dough about in your hands and making shapes! My daughter and I had this idea about making a picnic feast for her Sylvanian families in the doll's house, and it came out so well, and was so much fun, I decided to share the idea here on my little blog.
So here is the recipe for the salt dough. We used white flour and cooking salt, which made a lovely soft and pliable dough. WHAT YOU NEED: - 2 cups flour - 1 cup salt - 3/4 cup water approx - acrylic paints - glitter - Non toxic varnish - Oven WHAT TO DO: - First to make your salt dough. Mix the flour, salt and water in a large bowl, till it forms a pliable dough. Add the water a little at a time. Add more water if need be. - Transfer your dough to a suitable surface (ie: table top or tray) - Make lots of fun and tiny dolly sized food - Put all creations on a baking tray and cook for approx 10-15 minutes at 200 degrees c - Take out and leave to cool - Paint using acrylics and decorate with a sprinkle of glitter if you wish! _ Lastly, once paint is dry, finish with a non toxic varnish - Perhaps crochet or sew a tiny picnic blanket and get the dolls out for a fabulous picnic! 
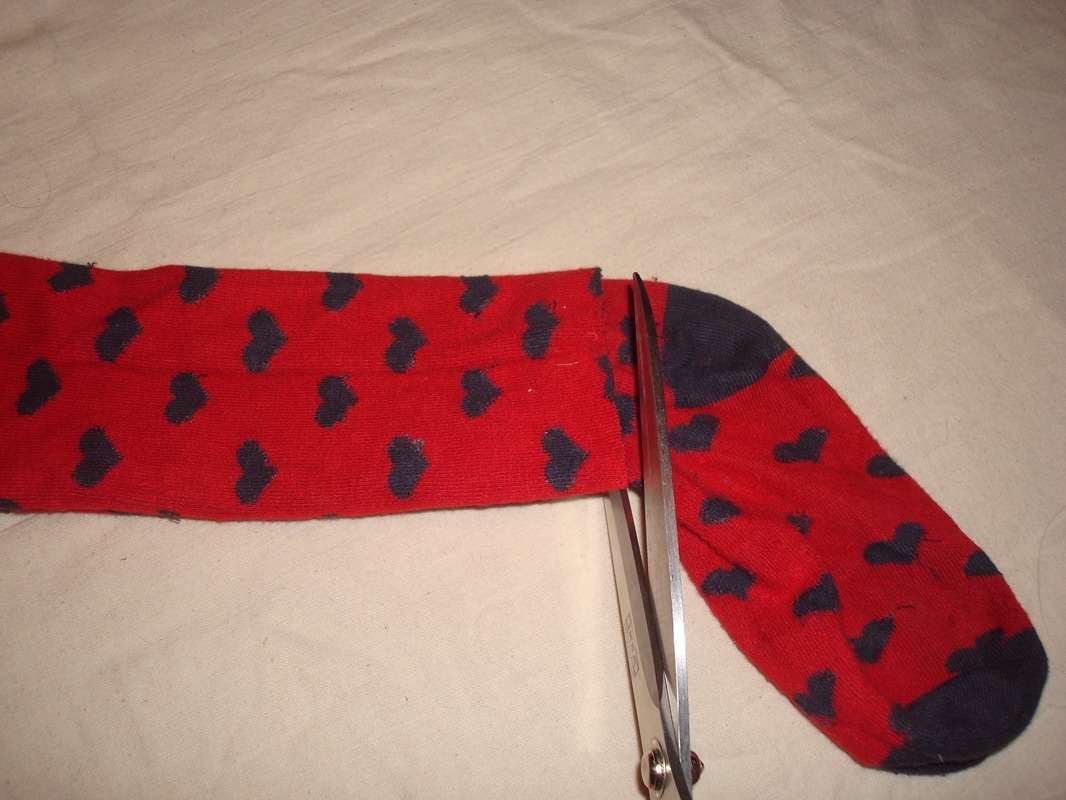
Baby leg warmers are such a great invention. They cover that little bit of leg between trouser and sock, They protect little knees when babies are learning to crawl, and for those of you practicing 'elimination communication', they provide perfect leg coverage for trouser-less babies and small people!
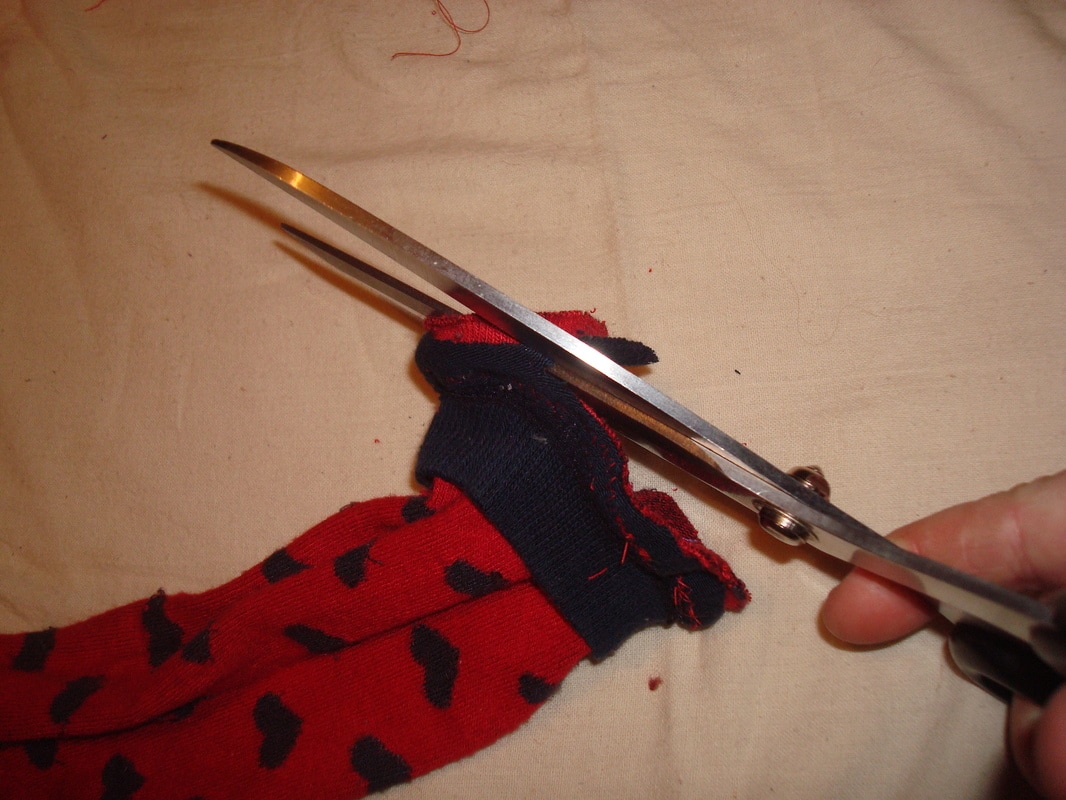
We used baby leg warmers all the time with our daughter, and here is a cheap and easy way to turn old holey socks into fabulous leg warmers! WHAT YOU NEED: A pair of old slightly longer socks (preferably with a cute or funky pattern or stripe) A second pair of old socks Thread Sewing machine Pins Fabric scissors WHAT TO DO: -Take your longer pair of socks and cut off the feet. Lay the first one over the second one, so you can cut exactly the same height. 
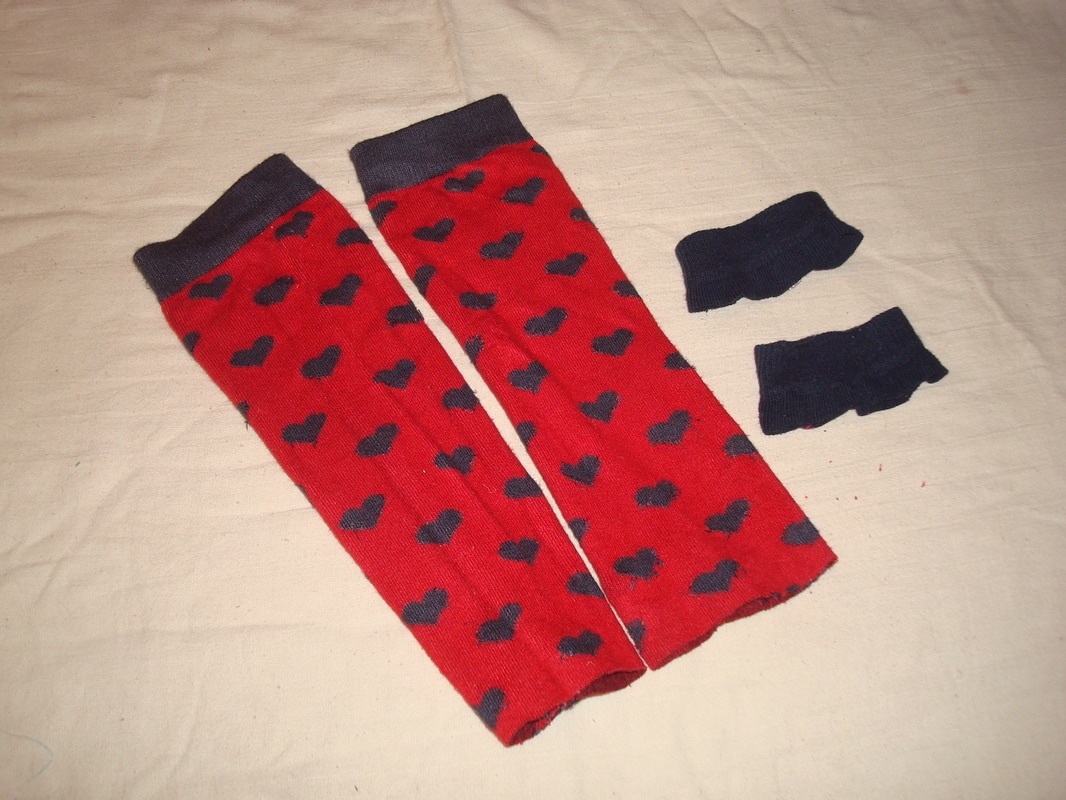
-Now take your shorter sock and cut the elasticated cuff off, with approximately 1cm of sock still attached.
-Turn your first cuff inside out and pin, upside down, to the raw end of your longer sock.
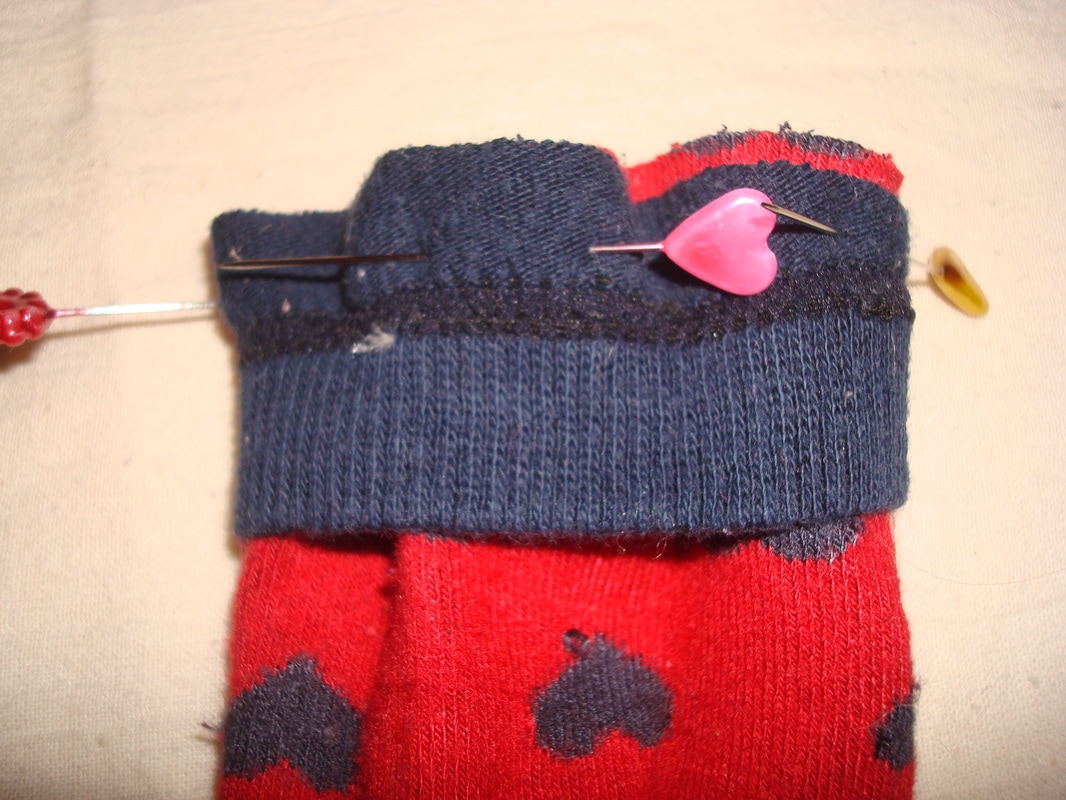
-Do the same with the other cuff and sock.

-Now sew using a straight stitch, but gently stretch while you are sewing , so the cuff is not too tight. Use a stretch stitch if your sewing machine has one.
TIP: Use the edge of the cuff as a guideline to sew along. 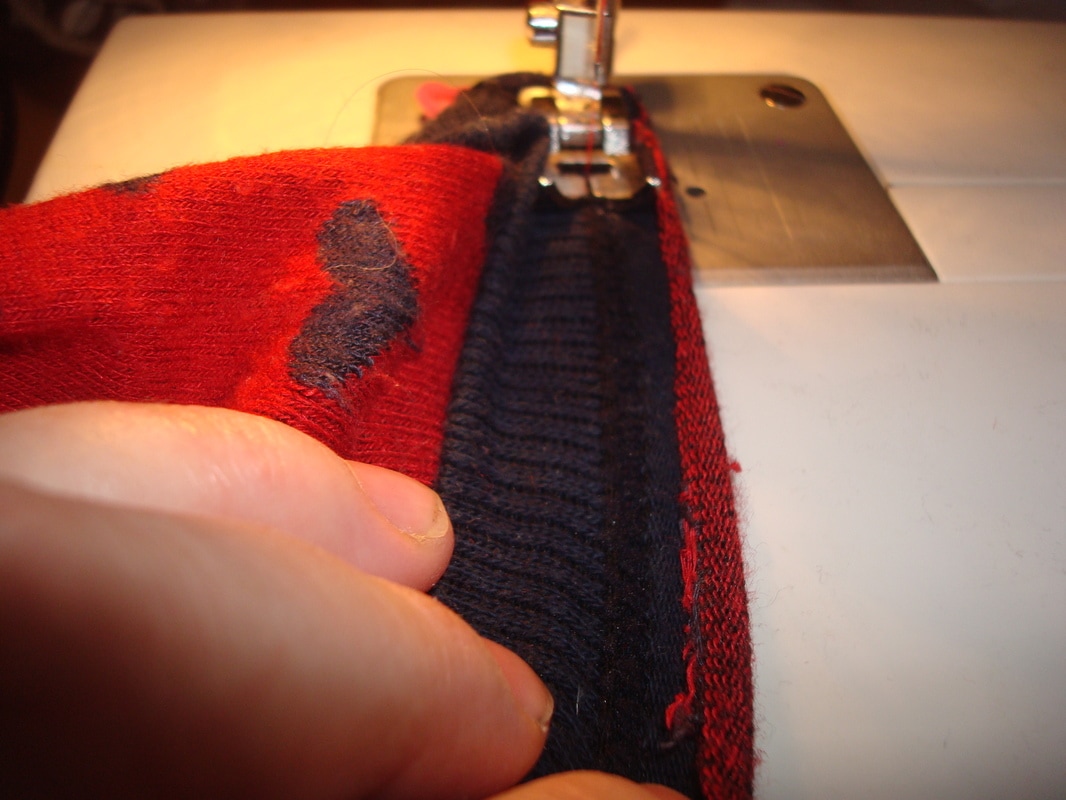
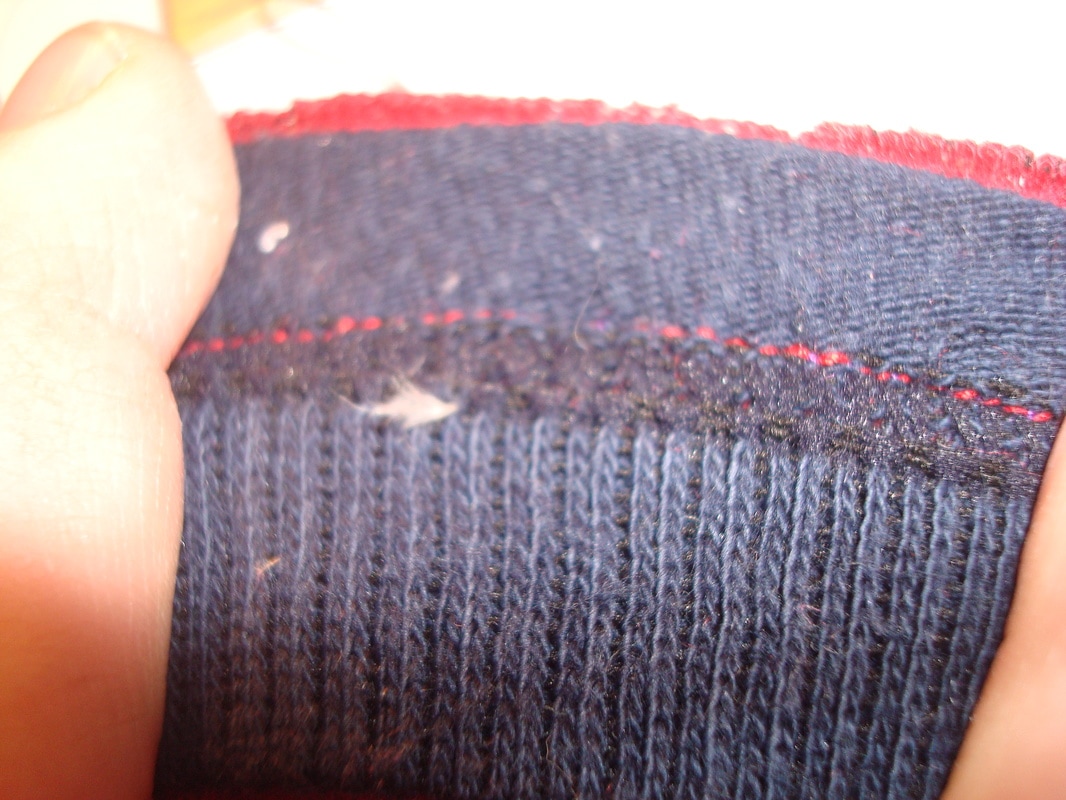
-Zig zag stitch the seams, and trim excess seam away. Remember to gently stretch while sewing.
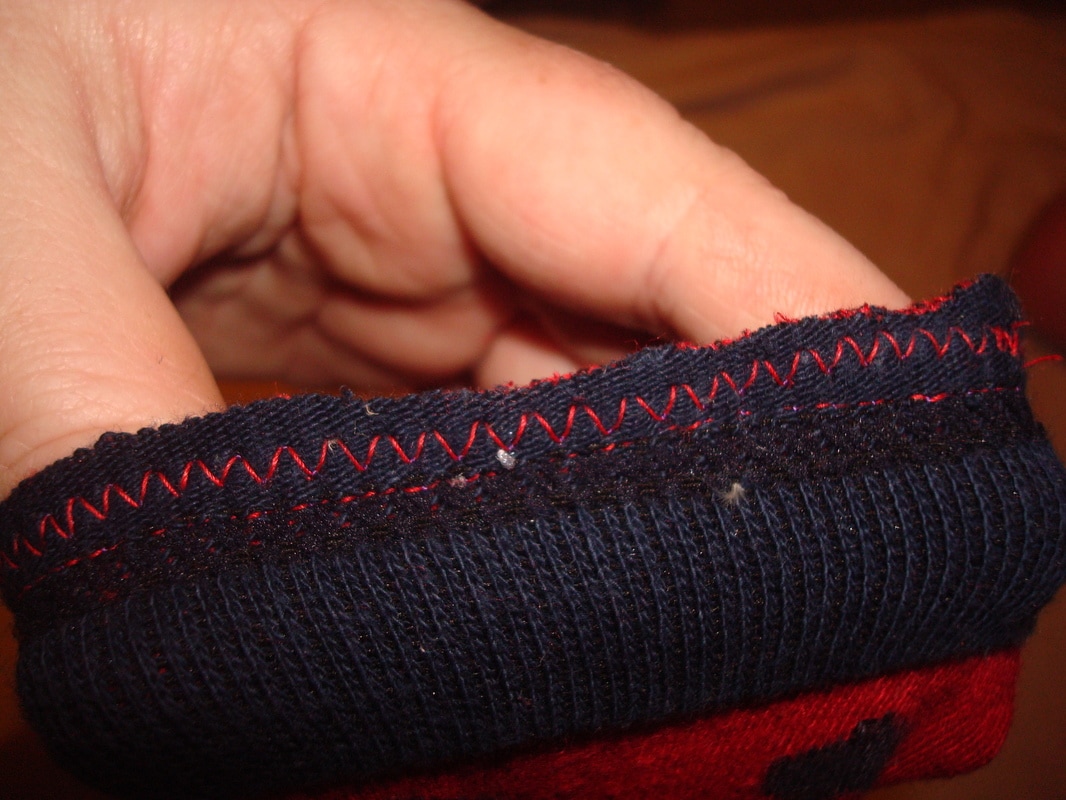
-Turn the leg warmer the right way round, and repeat with the other one.
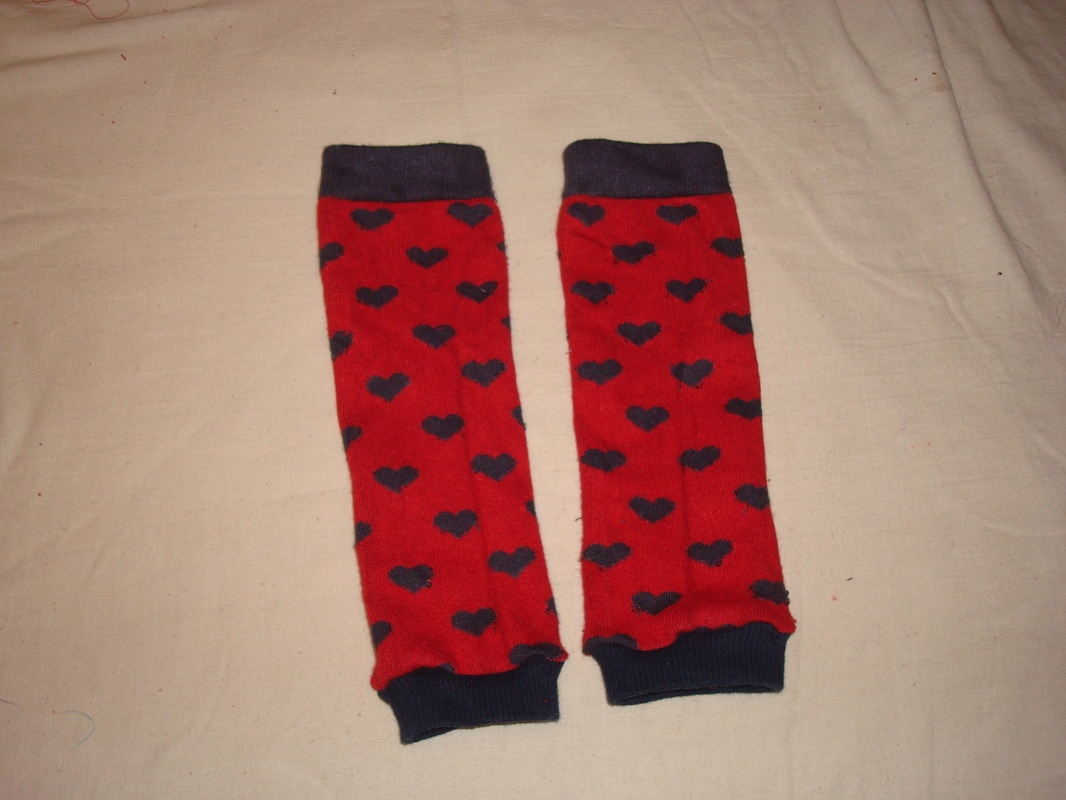
Et voila! A gorgeous new pair of baby legwarmers, that cost you nothing but the price of the thread and a bit of time and love!
[object Object]

I have discovered a passion for making Waldorf inspired dolls. I love every part of the process from the initial ideas and drawings right through to making tiny cute little outfits and finishing touches. I recently created a pattern for little crocheted shoes to fit a 10" Waldorf doll, so I thought I would share it here for anyone who wants to make some themselves. I have never written down properly any of the crochet patterns I have made, so bear with me if the lingo is not completely professional! Here goes...
WHAT YOU WILL NEED: -approx 10g dk wool ( or maybe less) - crochet hook, size 3.75 - Large eyed needle for weaving in ends WHAT TO DO: ch=chain sc=single crochet dc=double crochet sl st=slip stitch (dec)=decrease st=stitches - ch 3 and join with sl st - ch1, dc times 8 into centre of circle - ch 1, sc x 2 into next 3 st, dc x 2 into next 4 st, sc x 2 into next 3 st, join with sl st - ch1, (back loops only) sc into next 5 st, (back loops only) dc into next 8 st, ( back loops only) sc into next 5 st, join with sl st -ch 1, sc into next 4 st, (dec) 5 times, sc into next 4 st, join with a sl st - ch 1, sl st every st, fasten off and weave in ends. 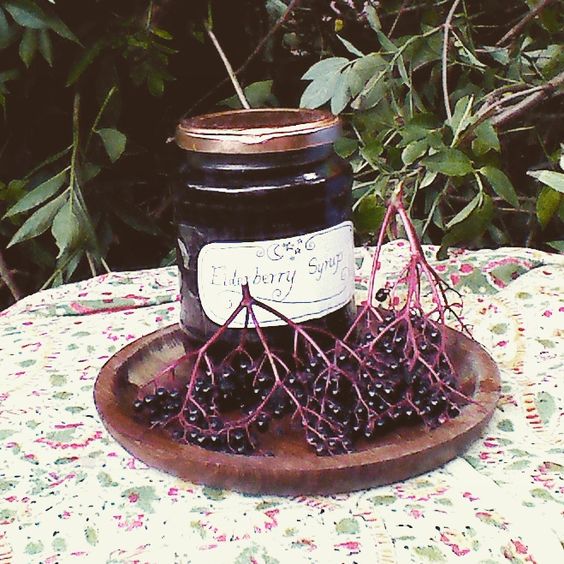
Elderberry syrup is a fantastic thing to have in your fridge over the winter months. It tastes delicious and it is so packed with vitamin C and all sorts of other cold and flu fighting goodness that it is a great medicine for the whole family to take a spoon full of every day. Now is the time that all the berries are ripening so go out and find an elder tree and get stocked up with this wonderful herbal remedy! You can also use dried berries which are easily purchased from wholefood stores or online.
WHAT YOU NEED: 1 1/2 cups fresh elderberries or 2/3 cup dried elderberries 3 1/2 cups water (preferably spring water) 2 tblspn fresh or dried ginger 1 tsp cinnamon powder 1/2 tsp cloves 1 cup raw honey WHAT TO DO: - Pour the water into a saucepan and add elderberries, ginger, cinnamon, and cloves -Bring to the boil then cover and simmer for about an hour till liquid has reduced by about 1/2 - Remove from heat and allow to cool till lukewarm - Pour mixture through a sieve into a glass or ceramic bowl and squish all liquid out of berry mixture - Put berry mixture into compost and add honey to your liquid, stir in honey well - When honey is well mixed pour into sterilized jars or bottles - store in the fridge, will last several months. 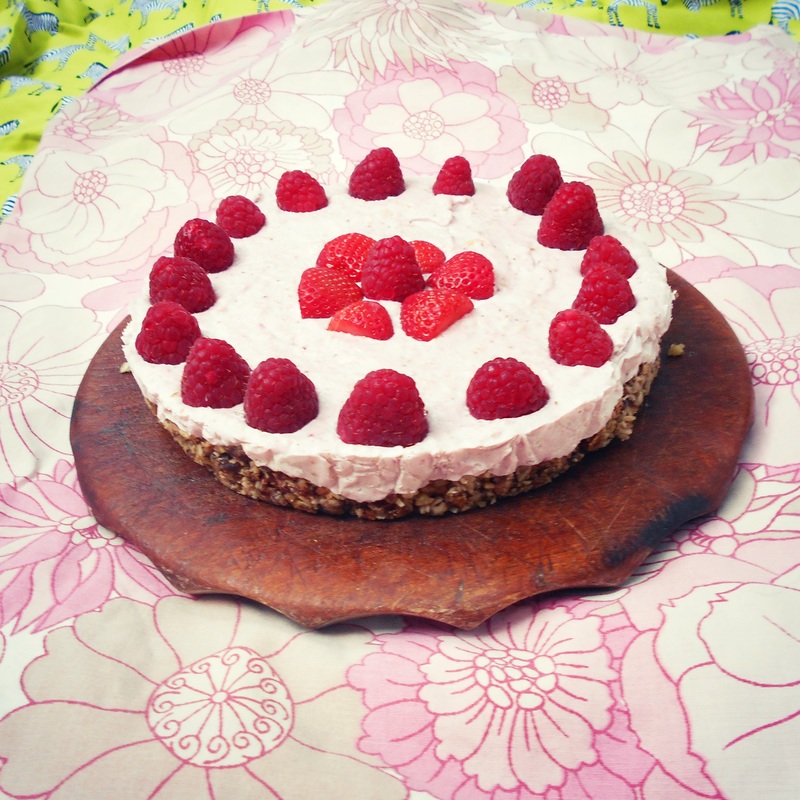
This recipe is a wonderful way to pamper yourself and your family with a delicious treat that is also good for you! It is extremely quick to make once you have soaked your nuts too, and it looks super impressive, so it's a good one to take to a food share or serve at a party.
WHAT YOU NEED: Base: 1 cup soft pitted dates 1/2 cup pecans- soaked for at least 2 hours 1/2 cup sunflower seeds 1 tsp cinnamon pinch sea salt Topping: 1 cup cashews- soaked for at least 2 hours 1 200g block creamed coconut Grated rind of 1 lemon juice of 1/2 lemon 2 tblspn honey 1 punnet strawberries WHAT TO DO: Base: - Put the sunflower seeds into a food processor and blend well - Add pecans, dates, cinnamon and salt and process till it all sticks together - Line a small round tin with cling film or foil and press the base firmly and evenly in - Put in freezer Topping: - Grate the creamed coconut and blend together with the lemon rind - Add all other ingredients except a few strawberries for decorating - Blend till smooth and creamy - Pour over base and spread smooth - Decorate with left over berries and put into freezer for 1 hour before serving 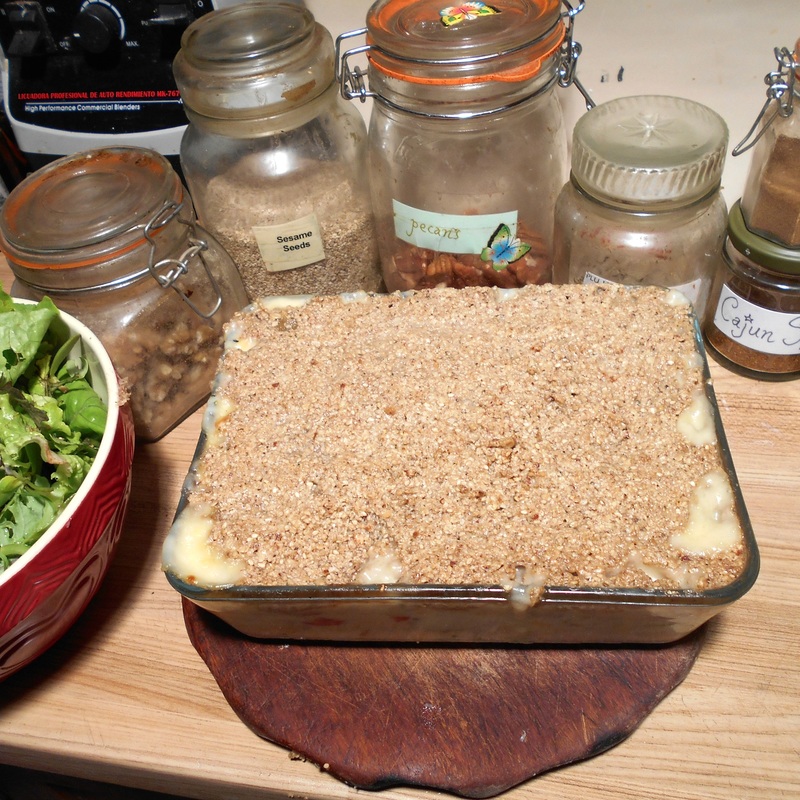
This is a yummy vegan crumbly topping, that you can add to your favourite vegetable pie filling to create a quick, easy and delicious crumble . We made ours to top a cheesy vegetable mix here, but I have also made scrumptious vegan versions with vegetables in a tomato, onion and herb sauce. WHAT YOU WILL NEED: - A pan of cooked veg in your fave sauce - 1 cup oats - 1/2 cup sesame seeds - 1/2 cup sunflower seeds -1/2 cup pecans - 1/2 cup walnuts - 3/4 cup coconut butter - 1/2 tsp cajun spice - 1 tsp garam masala - 1 tsp cumin - 1/2 tsp salt WHAT TO DO: - Turn your oven to 200 degrees c - Pour your vegetable and sauce mix into an oven proof dish - Put all nuts and seeds into a food processor and blend till finely ground or pulse if you like your crumble more chunky - Add all other ingredients and pulse till blended - Spread the nutty mixture over the vegetable mixture and bake for about 20 minutes - Serve with a green salad and enjoy! 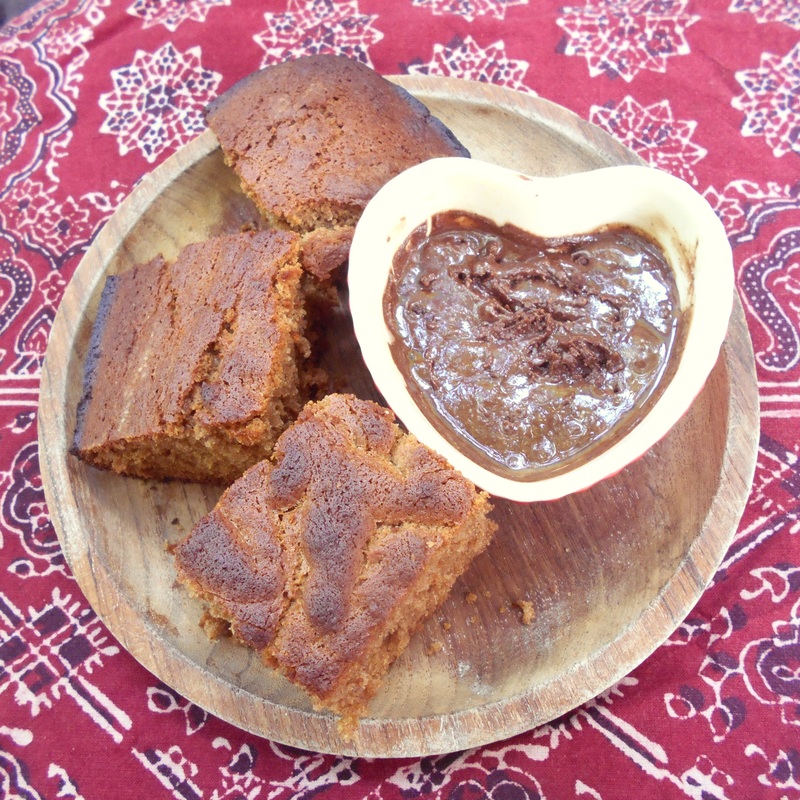
I am a total chocoholic, and I love chocolate spread, but there are so many ingredients in standard choc spread that I do not want to be putting into mine or my children's bodies. I decided it was time for a healthy choc spread and this simple 3 ingredient one I came up with is utterly divine!
WHAT YOU NEED: Small jar of almond butter (Or nut butter of your choice) 2-3 dessert spoons raw cacao powder 1-2 dessert spoons honey or date syrup WHAT TO DO: Simply mix all ingredients together with a spoon till completely mixed and put into a jar. Keep refrigerated. 
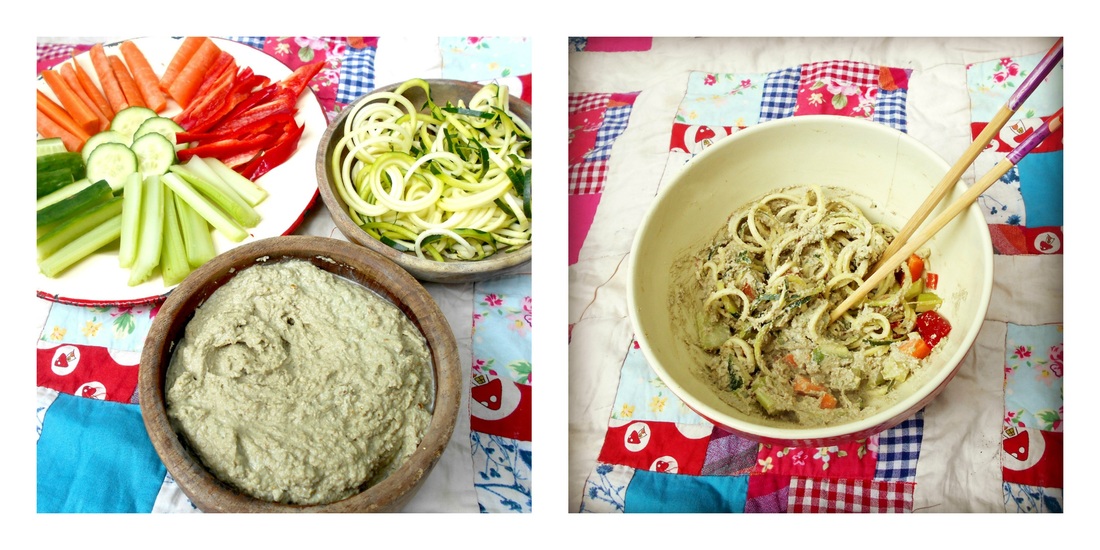
This is a very easy and delicious dip, and can also be used as a sauce base for courgetti spaghetti! (Spiralized courgette.) You can make your own variations and substitutions to personalize this yummy dip to your own taste preferences too. Soaking the seeds activates the enzymes making this dish extremely healthy as well as delicious! WHAT YOU NEED: 1 cup sunflower seeds- soaked over night 1/2 cup sun dried tomatoes- soaked over night (keep the soak water) juice of 1/2 lemon tamari or soy sauce clove of garlic pinch of sea salt 1 dessert spoon dried yeast powder (engevita) 1 tblsp tahini 1tsp spiralina powder dash of olive oil WHAT TO DO: - Drain and rinse your sunflower seeds and put into blender or food processor - Drain your sun dried tomatoes,( setting aside the soak water) and add to blender - Add all other ingredients to blender along with a bit of the tomato soak water and blend. - If mixture is not blending well add more soak water till it is smooth and creamy - Transfer into a pretty bowl and serve with veg sticks, or mix into a bowl of corgetti spaghetti and mix in chopped vegetables and maybe some sesame seeds for a light, raw version of cooked pasta and sauce, yummy! 
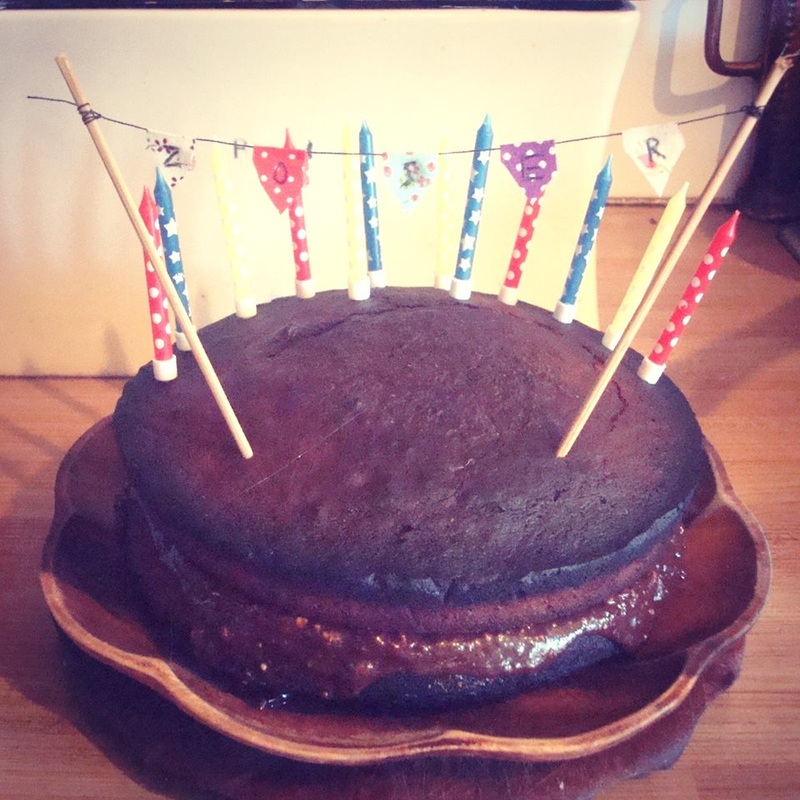
Another recipe post, but this one is just too good not to share!!! This is my go to cake topping of choice, especially on a birthday! It makes a thick, rich fudgey cake topping that is sugar free and also vegan!
WHAT YOU NEED: - 1/2 cup coconut butter - 4 tblsp date syrup (or agave/ honey) - 4 tblspfull fat canned coconut milk (the solid creamy bit at the top of the can) - pinch sea salt - dash vanilla extract - 3 tblsp cocoa powder WHAT TO DO: - Put coconut butter and coconut cream into a metal or glass jug and melt in a pan of hot water - Add all other ingredients and mix well till completely blended - Put mixture into freezer for about 1 hour till it becomes thick and spreadable, or fridge overnight if you don't have a freezer - Spread thickly over cake and enjoy! NOTE: Keep you cake in the fridge till you serve it as this topping becomes melty at room temperature! 
This is a modified version of a recipe created by Shazzie. My kids and I love making raw puddings and this one came out so lush and cakey and chocolaty that I had to share! So without further ado...
WHAT YOU NEED: 1 punnet strawberries 4oz raw cacao powder 100ml orange juice 4oz shelled hempseed 4oz cacao butter 3oz coconut butter 2oz goji berries- soaked 2 tblspn date syrup 1tblspn maple syrup WHAT TO DO: -Melt cacao and coconut butter by placing them in a metal or glass jug or bowl in a pan of simmering water -Throw everything in the blender and blend till creamy. - Pour into a silicone mould - Refrigerate for a couple of hours - Decorate with strawberries or serve as is! 
I made this filling as an experiment one time and my boy liked it so much, he requested it as his birthday cake filling!!! It is super chocolaty and rich and compliments a chocolate sponge perfectly!
WHAT YOU NEED: - 1 small jar of hazelnut butter - 2 dessert spoons coconut butter - 2 dessert spoons cacao powder - 2-3 tblsp honey (or sweetener of your choice) WHAT TO DO: - Put all ingredients in a bowl and mix thoroughly - Once your cake is cooled, spread evenly over the first layer of your cake - Lay your second cake on top and voila! 

This is a delightful mixture to whip up for you and your loved one to enjoy this valentines day. What could be more romantic than soaking in a steamy, scented bath together, maybe massaging each others feet while you are in there as an extra gift of love to one another. I have chosen these particular ingredients, partly due to they look so pretty together, and partly as they all have some kind of aphrodisiac quality.
WHAT YOU NEED: - 2 handfuls of dried rose petals: Roses are a universal symbol of love and they are a natural aphrodisiac, not to mention that they also turn the bath water a delicate shade of pink! - 2 handfuls of dried jasmine flowers: Since ancient times jasmine has been known as 'The queen of flowers. In India, jasmine is considered to be such a good aphrodisiac that the bride and groom's bedroom are decorated with it on their wedding night! - 2 handfuls of dried malva flowers: Malva is very soothing to the skin, and historically, people liked to spread it on doorways and weave it into garlands for the fertility and fire festival of Beltane. - 1 handful star anise: This beautiful herb is often used for increasing sex drive - Some candles WHAT TO DO: - Light some candles and place safely around your bathroom - Run a steamy hot bath - Mix all ingredients together and sprinkle liberally into your bath - Pour two drinks of something cold and delicious and enjoy your valentines bath with your loved one! HAPPY VALENTINES DAY!!! 
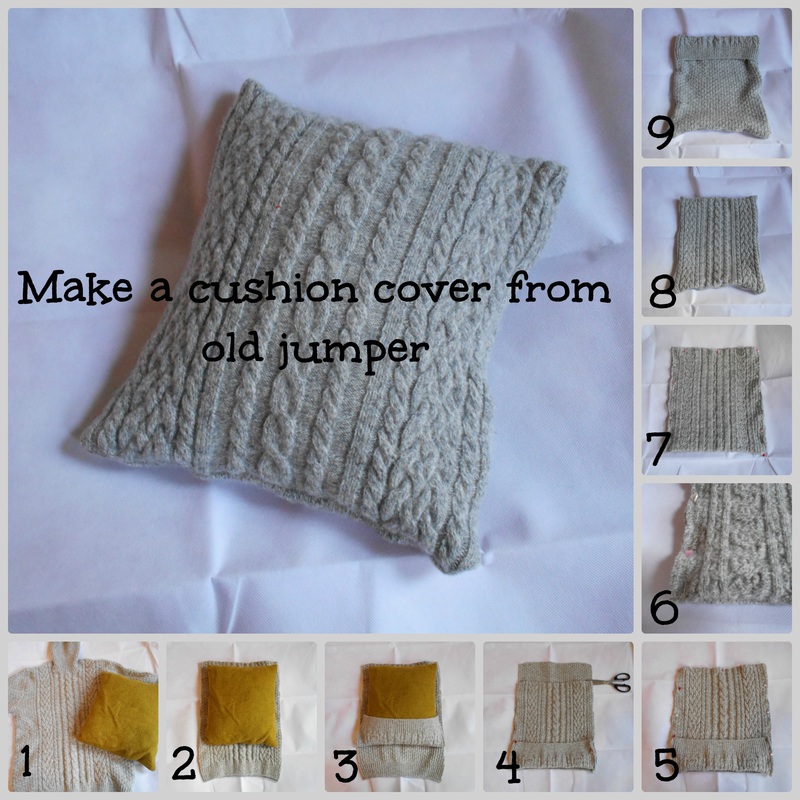
This is such a quick and easy project, but the result looks chic and stylish. You can whip up one of these babies in under half an hour! So start trawling the charity shops for nice woolen jumpers and get stitching! I think it would look really nice if you had a few different sizes of cushion and a few different neutral shades of wool together, but brights and patterns would work just as well.
WHAT YOU NEED: - A cushion - An old woolen jumper - Fabric scissors and thread - Pins - Sewing machine (Optional) WHAT TO DO: 1 ) Lay your jumper flat and lay cushion on top 2) Cut around your jumper leaving about 2cm round the top 3 sides and approximately 10cm at the bottom, preferably with the jumper edge right at the bottom 3) Fold the long edge up over your cushion 4) Take cushion out, move top section down (still folded) so the fold line matches the edge of the bottom section, and cut off the excess at the top 5) Keeping the folded bit in place, lay the two sections right sides in facing each other. Pin the two sections together all the way round 6) Make sure all 3 layers are pinned where the fold is 7) Sew all the way round the top three edges in straight stitch, then go round the edge again with a zig zag stitch so the edges don't fray 8) Turn cushion cover right way round 9) Fold the extra fold down over the back of the cushion cover and place cushion inside You can add buttons if you like, but this will hold together just fine without, especially if the flap is quite big. 
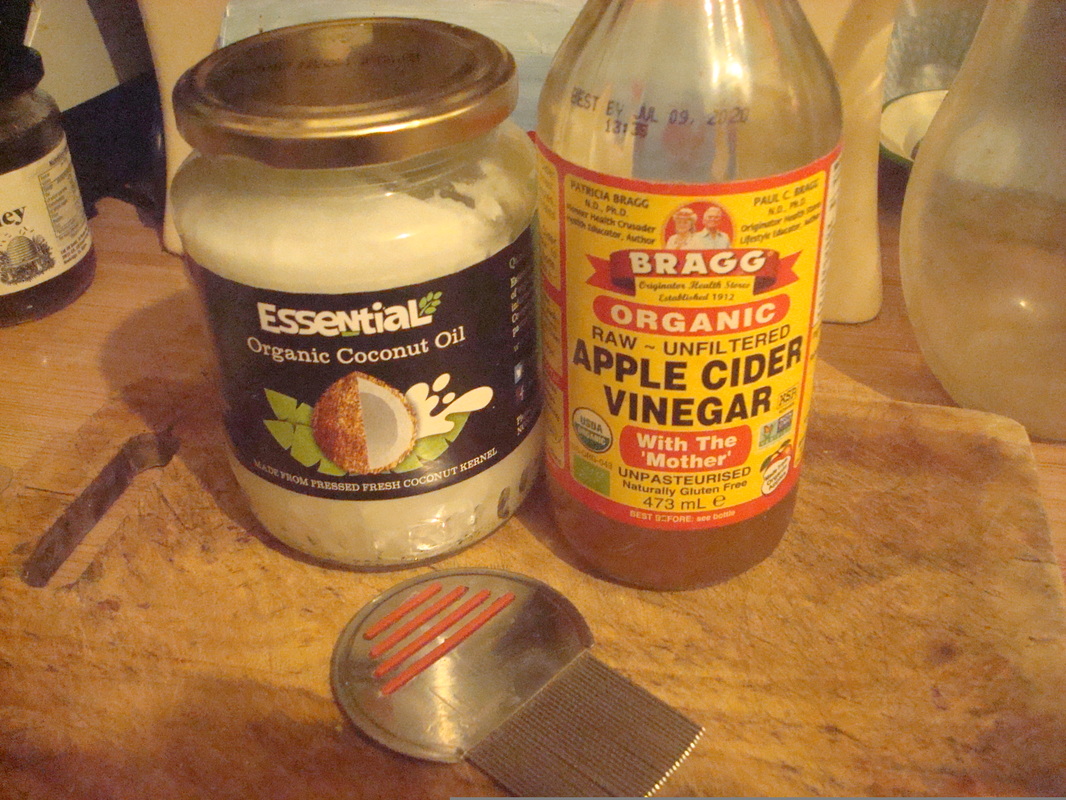
I have always been an advocate of natural remedies, but in the past I have felt despondent about seemingly constant nit invasions to my children's heads and ineffectual treatments, but I have good news! A natural treatment, that really works and even improves the condition of your hair and scalp! Remember it is best to treat the whole family at the same time, even if only one or two people have nits to avoid having to do the whole process again in a couple of days if one other person had one nit egg that then hatched!!!
WHAT YOU NEED: - a 'nitty gritty' metal nit comb (they get the eggs as well as the lice) - coconut butter - apple cider vinegar WHAT TO DO: - Brush and nit comb your child's hair dry first - Pour cider vinegar either neat or a little watered down over the roots of the hair and massage it in, then comb it through - Let the vinegar dry naturally or dry with a hair dryer - Next take a generous handful of coconut butter and warm in the palms of your hands - Massage this all over the scalp then take your comb and comb right through the hair - Wrap hair in a towel and leave this treatment on overnight or at least for a few hours - In the morning, pour more vinegar over the scalp and comb again - Wash out with shampoo - Remember to launder all bedding and wash hairbrushes (I recommend a couple of drops of tea tree oil with hot water for the hairbrushes ) - Nit comb the hair every night for a week, then do treatment again - Now your whole familie's hair should be completely nit free and super silky I know the ingredients for this treatment become pricey if you have a bigger family, like us, but I believe the cost is well worth it for the effectiveness of the treatment. 

I absolutely LOVE to bling up my lampshades. There is barely an ordinary lampshade left in our house! This is so easy to do, but it makes such a difference to the whole look of the lamp and indeed the ambiance of the room! All you need is a few simple bits and bobs and some imagination and you will be creating gorgeous one off original lampshades before you know it!
WHAT YOU NEED: - a light coloured lampshade - bits of fabric (vintage floral's work very well) - Ribbons or lace for edges - Mod podge glue (available on ebay) - bead or fringe trim, long enough to go round the base of your lampshade (also available on ebay and some etsy shops) - paintbrush and fabric scissors - fabric glue WHAT TO DO: - Lay out some newspaper to keep your work area clean - Cut strips and pieces of fabric and roughly lay in place over lampshade to where you will glue it - Begin painting the mod podge onto the lampshade and sticking the fabric on piece by piece - Very slightly overlap the pieces - When you have covered the lampshade completely, paint a layer of mod podge over the whole thing to seal it - Once this is dry, trim any rough edges neatly - Now glue a piece of velvet ribbon or lace all round the top edge of the lampshade with fabric glue - Now take your bead trim or fringe and carefully glue round the bottom edge bit by bit and slightly overlap edges - Once that is dry, glue on a piece of ribbon or lace over the ribbon the beads are attached to - Add embellishments as you see fit, in the lampshade pictured, I have made some strings with tiny glass beads and a little wooden heart at the bottom, and stitched them on at intervals around the lampshade. You can also mod podge on extras, like cotton lace doilies or even leaves or pressed flowers! Have fun with it. I would love to see pictures if anyone tries this project! Happy crafting! 

This cashew cream is super thick and creamy. It is delicious on it's own, but also a gorgeous accompaniment to pancakes and puddings. This is a vegan dream! I love putting it on banana pancakes ( simply mashed bananas, dehydrated over night into rounds) but is also heavenly with fruit crumble or pie too!
WHAT YOU WILL NEED: - 2-3 handfuls of cashew nuts (Soaked overnight) - 2-3 tblsp date syrup (or sweetener of your choice) - dash of vanilla extract - dash of water WHAT TO DO: - Put all ingredients into blender and blend till creamy and smooth - If cream is too thick, add a tiny bit more water and pulse till blended - Use a spatula to get cream out of blender jug and into a jug or bowl - refrigerate till needed - Enjoy the most yummy nut cream you have ever tasted! (and try not to eat it all at once!) 
|

Arisha's Inspiration CornerHi there, I am Arisha. Thanks for stopping by my little corner of inspirations! I LOVE making things. This blog is a place for me to share with you, lots of lovely things to make and do including: Subscribe below to receive each new post hot off the press direct to your email!
Archives
April 2019
Categories
|
 RSS Feed
