Arisha's Inspiration Corner
A little blog to share crafts, recipes and ideas with you x
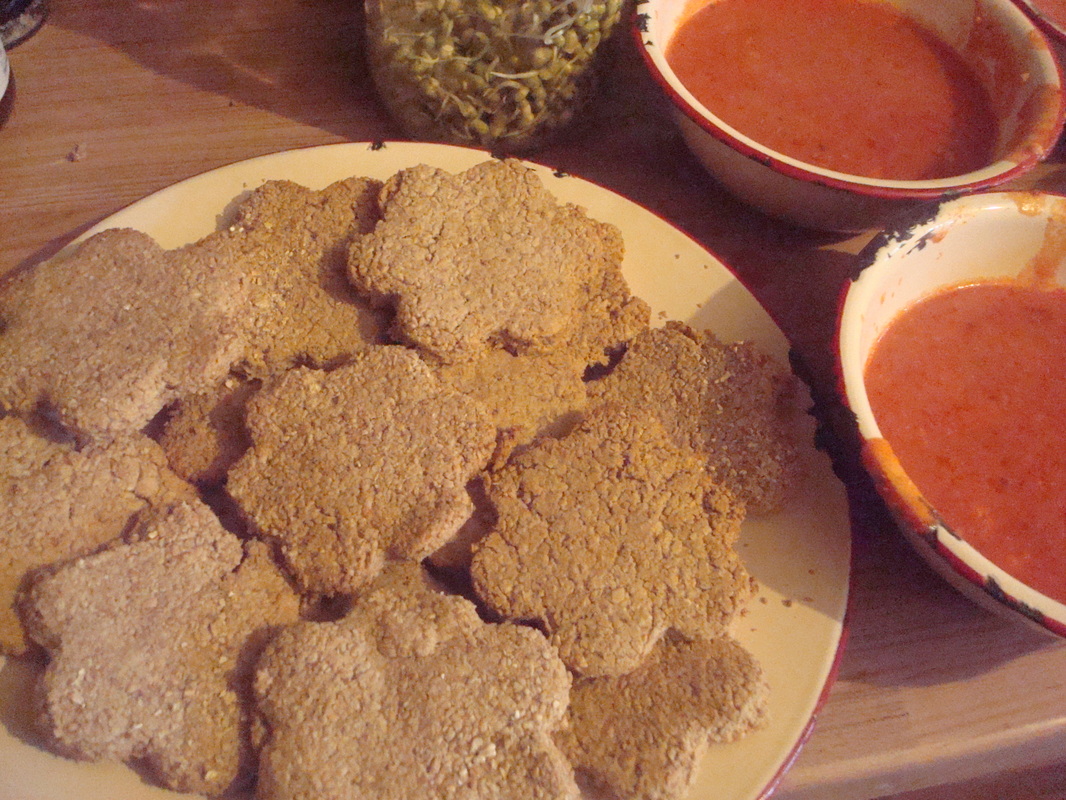
My Dad used to make these yummy oatcakes for our family as I was growing up and they were, and still are loved by all! I recently asked him for his recipe and made a batch for my own family! They went down pretty well with some homemade tomato soup. ( 'Tomato lover's soup' from the excellent cookbook 'Trinity's Concious Kitchen' ) I altered the recipe slightly by adding a handful of grated cheese and a tablespoon of engevita dried yeast powder to make them cheesy, but I am writing the original recipe as my Dad wrote it for me for this post.
WHAT YOU NEED: ( Makes approx 10 oatcakes) - 250g Fine oatmeal - Pinch of salt - Heaped tblsp butter- melted - Boiling water WHAT TO DO: - Turn oven on to 200 degrees c - Place oatmeal and salt in a large bowl - Add melted butter and stir in - Add boiling water a little at a time till mixture is a pliable dough - Use a little oatmeal to 'flour' the surface and roll out to approximately 1/2 cm thickness - Use a cookie cutter or a glass to cut out your oatcakes and place on a greased baking tray - Place in oven for 20-25 mins - Enjoy with a bowl of steaming soup for lunch or with butter and jam at tea time! 
0 Comments
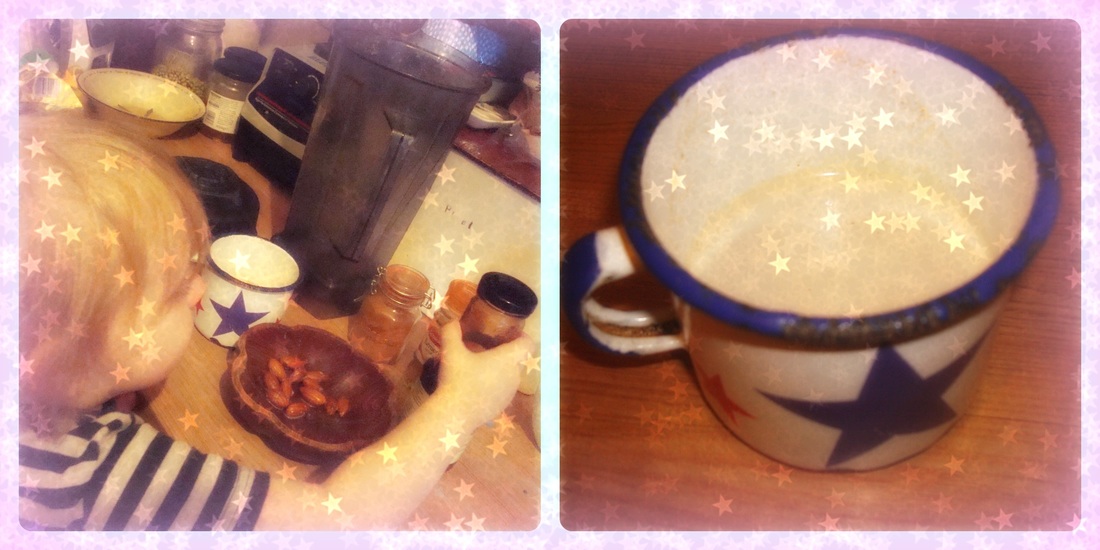
This delicious drink is so yummy, you will want to drink it every single day! It is super creamy and sweet, and also has a whole host of health benefits too! All my kids love this, and you can add extra's such as raw cacao to turn it into chocolate milk or superfoods to give it an extra health boost too! My little boy loves to be involved in the preparation of nut and seed soaking (stirring up a nutty concoction in his own little jar! ) and due to the nuts and seeds are soaked., the enzymes are activated and get you feeling great! You can switch nuts to your own personal fave's too.
WHAT YOU NEED: 3/4 cup hemp seeds handful almonds handful cashews 1 tsp turmeric 1 tsp cinnamon few dates dash of date syrup WHAT TO DO: - Place hemp seeds, nuts and dates in a jar and cover with spring or filtered water. Leave to soak overnight or at least for a few hours - Drain nuts, seeds and dates and place in blender. Add spring water, enough for however much milk you want to make - Blend for a couple of minutes - Sieve milk into a large bowl - Rinse blender then pour milk in. Add turmeric, cinnamon and date syrup and blend again. - Pour into glasses and enjoy! 
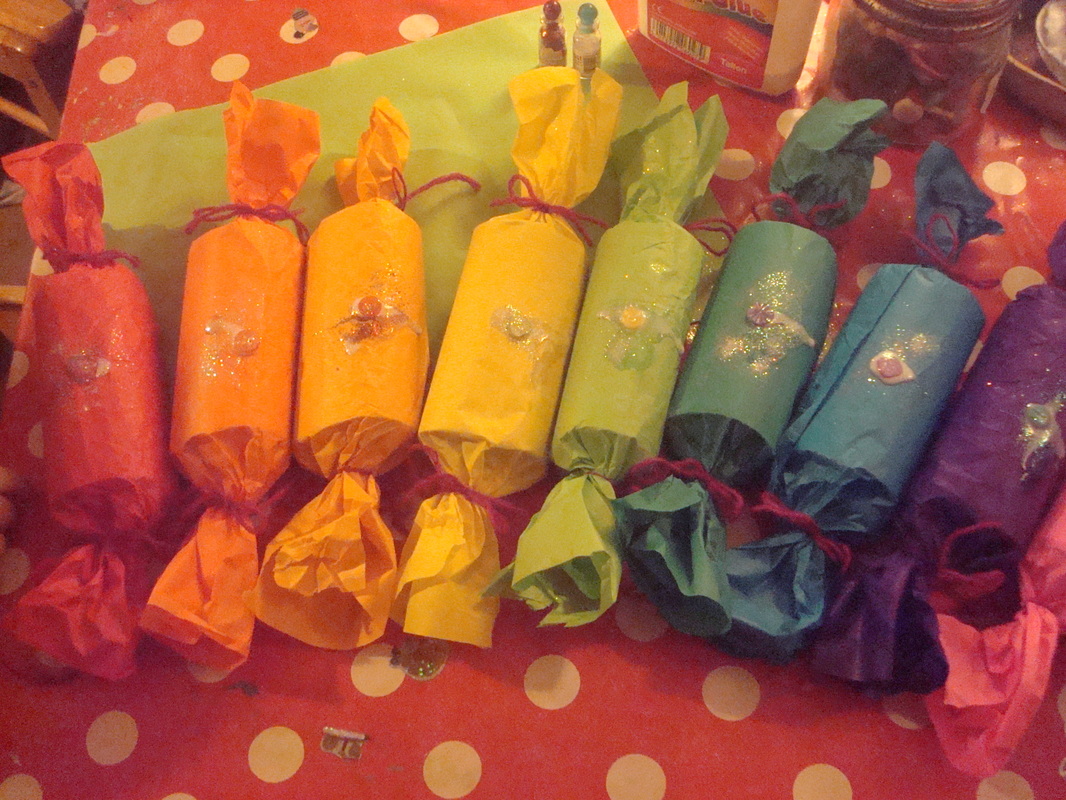
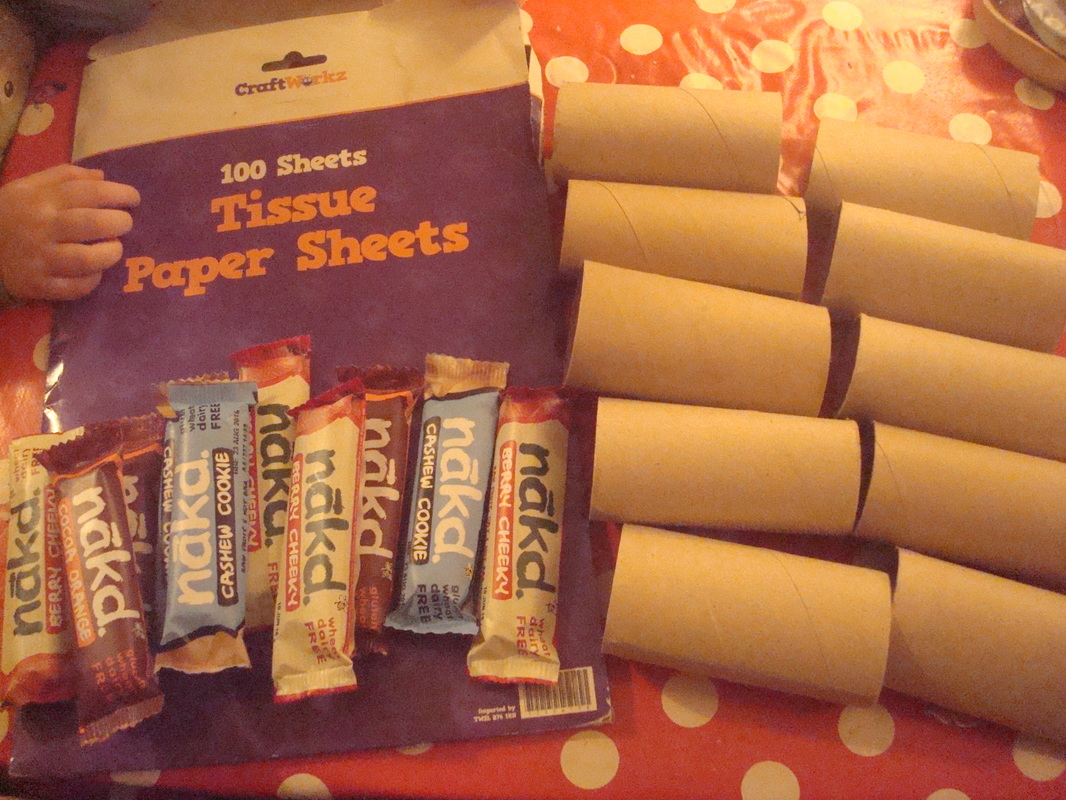
My kids absolutely LOVE Christmas crackers, so we do usually end up buying some, but I am always a bit annoyed at the extra tiny pieces of plastic junk that spring forth from said crackers and end up scattered everywhere. I must also admit to cringing at the bang part too, so this year, I vowed to make some marvelous, beautiful and wholesome crackers which don't go bang with my children. We had a lot of fun making these and you could really go to town with the decorations too. We used edible treats, but you could use handmade soaps, ostheimer animals, pots of bubbles, anything you like to fill them!
WHAT YOU WILL NEED: - Some empty toilet roll tubes - Coloured tissue paper (A4 size is ideal) - Wool or ribbon or string - Something yummy to go inside (We used Nakd bars) - PVA glue, buttons, sequins, glitter WHAT TO DO: -Fill your tubes with the presents/ bars - Carefully roll the tube up in the tissue paper and twist the ends to seal in the present - Do this with all your tubes - Now cut small lengths of wool (or ribbon/string) and tie round each twisted end - Finally put a blob of PVA glue on each one and decorate with buttons or sequins and lots of glitter! - Put out of the way somewhere to dry and store in a box till Christmas day! 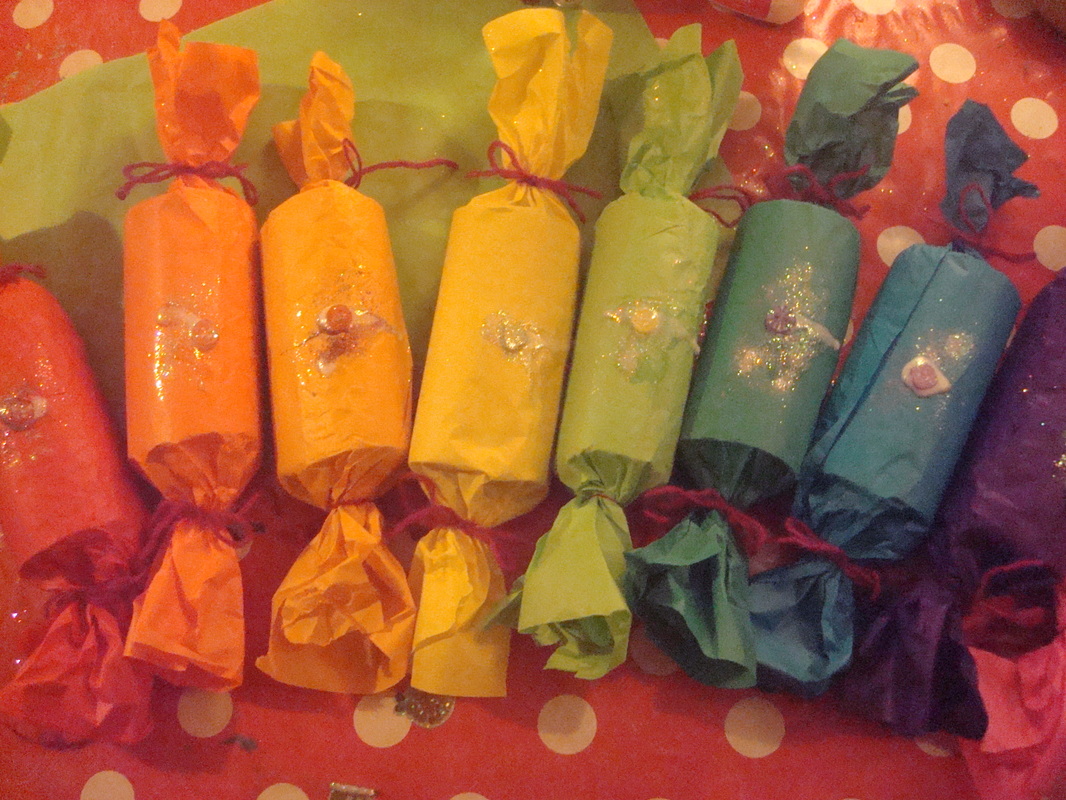

Festive orange and driftwood mobile #christmasdecorationdiy #handmadechristmas #rusticchristmas26/11/2015 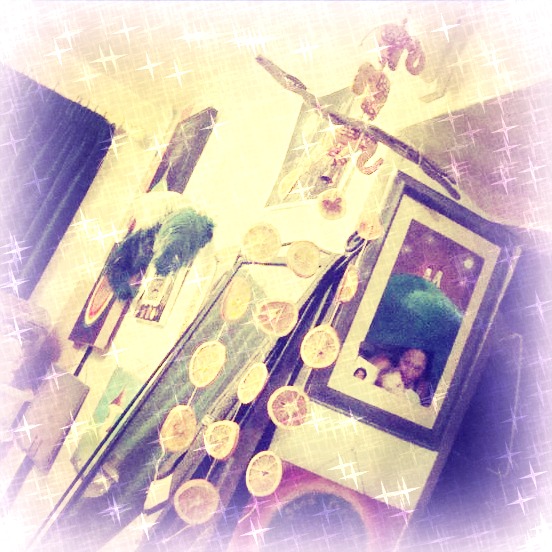
I usually make a variation of this project every December using dried orange slices and sometimes cinnamon sticks to begin our festive preparations! They give off a gorgeous aroma and look so pretty. I have omitted the cinnamon this time and hung the orange slices from a lovely driftwood stick, but you could use any stick you like and add cinnamon sticks too if you feel like it!
WHAT YOU NEED: - 3-4 oranges - Baking sheet and foil - Driftwood or any stick - Hemp string - Big darning needle WHAT TO DO: - Line your baking sheet with foil - Slice your oranges approximately 5mm wide or a bit thinner and lay onto your foiled baking sheet -Bake @ 180 degrees, turn after one hour, then again 30 minutes later. Keep checking them as they can go brown quite quickly - Gently peel them off foil once cool - Meanwhile, take your stick and tie string round each end to make a loop for hanging your mobile. - Cut 3 long pieces of string and using the darning needle thread string through orange slices going through the peel each side - Thread on as many as you like to each string, then tie all 3 strings to your stick, I made the middle one a bit longer than the side ones. - Tie a little knot at the bottom of each string and hang up somewhere pretty! I hung mine over the radiator as the heat rising through the oranges makes such a lush smell! 
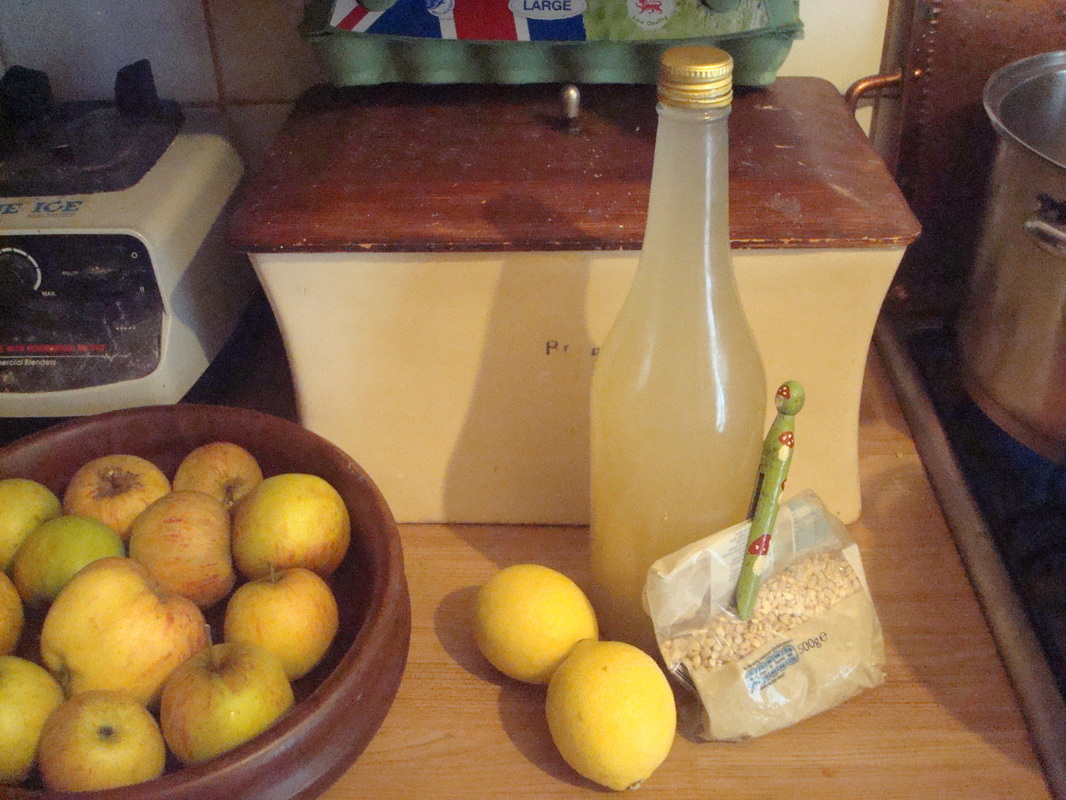
I made this lemon barley water from my dad's instructions when my partner had a kidney problem, and he loves it so much that I make it all the time now and he drinks it instead of coffee!
There are many health conditions this soothing drink can help with, including: -urinary tract infections -weight loss and cholesterol maintenance -kidney stones -acne -detoxing -aiding digestion This drink is also full of anti-oxidants, which are reputedly fantastic for cancer prevention and the promotion of a healthy heart, and it includes vitamins B1, B2, B3, B5, B6, B9 and vitamin E too, so it makes a great winter tonic for the whole family! WHAT YOU NEED: Juice of 2 lemons 1/2 cup pearl barley 2 tblsp honey spring water WHAT TO DO: -Put the barley into a saucepan and fill almost to the top with spring water -Bring to the boil then cover and simmer for approx 20 mins -Drain water through a sieve into a bowl ( Save barley to add to a soup or stew) -To the barley water add the lemon juice and stir in the honey -Leave to cool then pour int a jug and transfer into a glass bottle -Store in the fridge, but warm before consuming 
These are so simple and so yummy, I seem to be making them all the time at the moment. They are quite soft but the peanuts give them a satisfying extra crunchiness.
WHAT YOU NEED: 1 cup spelt flour 1 1/2 cups oats 3/4 cup soft butter 3/4 cup honey 1/2 tsp baking soda 1 egg 3 heaped dessert spoons crunchy peanut butter WHAT TO DO: - In a large bowl mix together the oats, flour and baking soda -Add butter, egg and honey and mix in - If mixture is too wet add a little more flour or oats -Grease 1 or 2 baking tray's and dollop dessert spoons of mixture on, then flatten and shape into circles approx 1cm thick - Bake at 200 degrees c for 10-12 minutes - Remove from oven and allow to cool (a little! ) before eating 
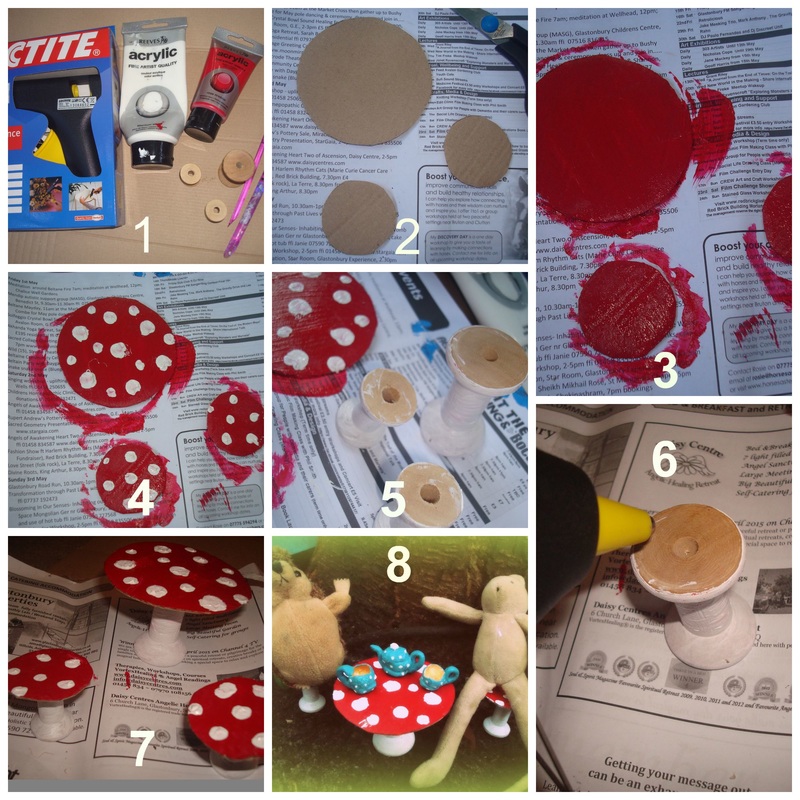
Today's craft is an easy to make and super cute little set of fairy furniture for pixies, fairies and woodland creatures to enjoy a civilized tea party in the woods! Combine this with an acorn fairy tea set from one of my previous blog posts and you have hours of entertainment for your little pixies (and yourself if you are anything like me!)
WHAT YOU NEED: - 3 wooden cotton reels, 1 big, 2 small - Piece of cardboard - Acrylic paints in red and white - Hot glue gun WHAT TO DO: 1) Gather your supplies and lay down a sheet of newspaper 2) Draw a bigger circle and two smaller on the cardboard and cut out. ( I used a jar lid and an egg cup) 3) Paint circles red 4) Once dry find a little helper to paint jolly white spots onto your circles 5) Paint the sides of your cotton reels white 6) Once dry use the hot glue gun to apply hot glue to the tops of the cotton reels and stick the circles on securely. (Make sure your little helpers are well out of the way for this bit) 7) Wait for your creations to dry 8) Have a tea party in the garden or woods with some friendly little woodland creatures or fairies! 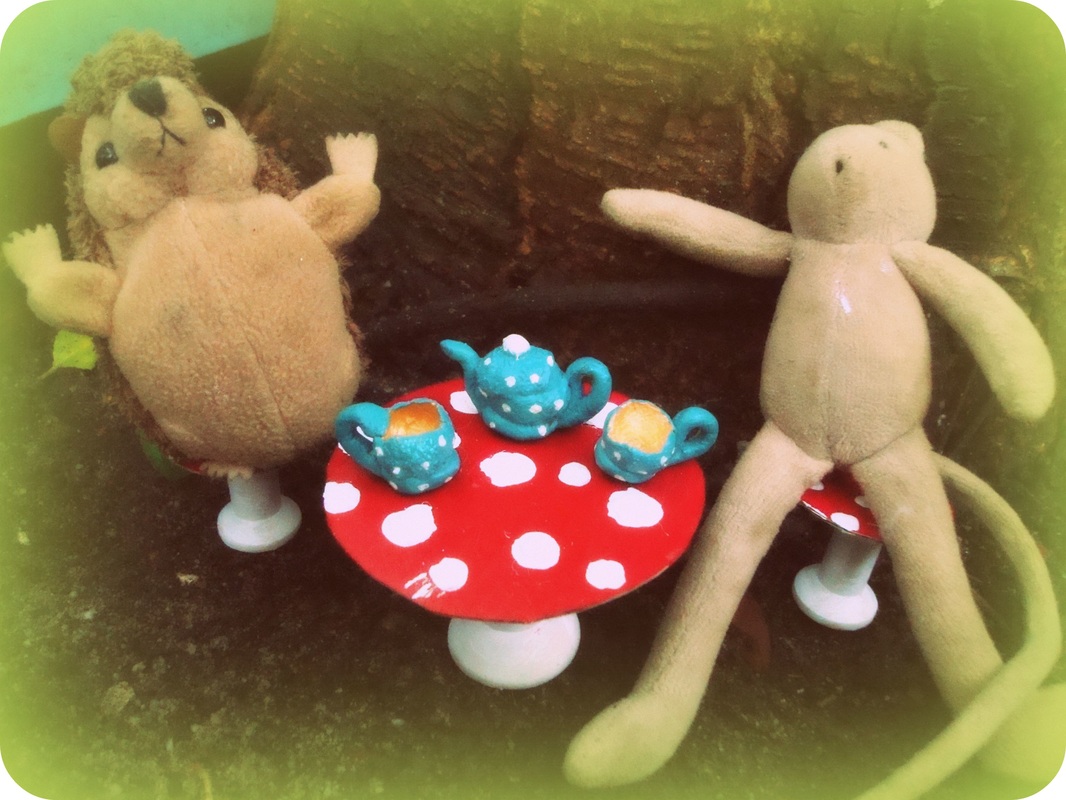


This is the first time I have made this cake and it is YUMMY! Would be delish with a scoop of vanilla ice-cream too.
WHAT YOU NEED: - 1 1/2 pineapples or 1 tin of pineapple rings - glace cherries (optional) - 8oz butter plus 2oz butter - 8oz honey - 8oz spelt flour - 1/2 tblspn baking powder - 1 tsp vanilla extract WHAT TO DO: - melt the 2oz butter and pour into an 8 inch cake tin - Slice the pineapple and arrange the rings into the tin (you can add glace cherries too if you like) - Drizzle with honey - Cream remaining butter and sugar together in a bowl till smooth - Add eggs one at a time with a little of the flour - Mix baking powder with the rest of the flour and vanilla extract and add to the mixture - If the mix is too wet add a little extra flour - Spoon mixture onto pineapples and bake for 40 minutes @ 160 degrees centigrade - Wait for cake to cool then tip out onto a plate and marvel at your pineapply creation! 
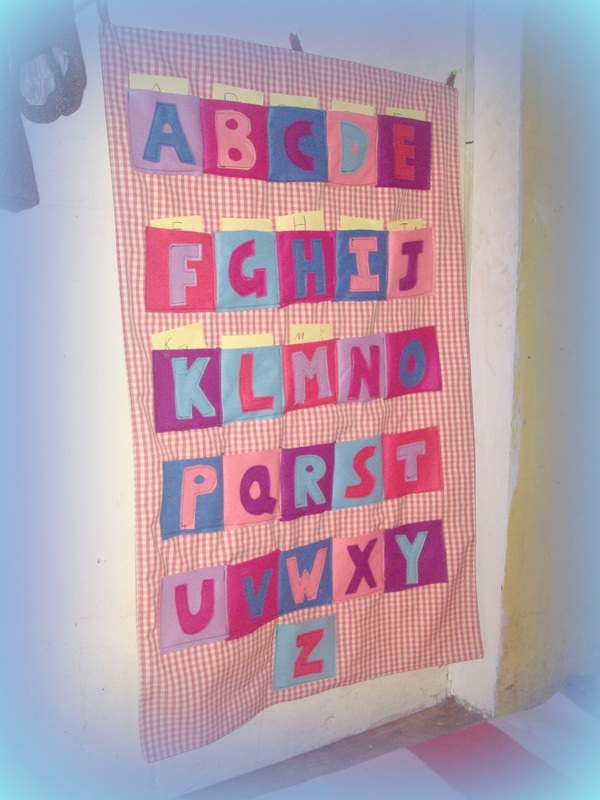
My daughter is very excited about learning to read. She can't wait till she can curl up with whichever book she fancies and read every word! We haven't pushed her to begin reading till she was ready, and that time has definitely come! To help make the process a bit more fun, I decided to make her this alphabet pocket wall chart. The idea is that she/we can draw pictures of things that begin with each letter and put it in the correct pocket, or even put actual things that begin with each letter in the pockets, if they are small enough! This way she can make the letter associations more visual and hopefully remember them better! I made this using a sewing machine, but you could easily sew this by hand too, and even stick the letters onto the pockets with fabric glue if you wanted.
WHAT YOU NEED: - 7 pieces of coloured craft felt ( the squares you get in craft shops) - Large piece of thick fabric for back, mine measures 22 x 34 inches (Or 2 thin pieces sewn together) - Small length of ribbon (Approx 9 inches) -Thread WHAT TO DO: - Cut out 26 squares of felt in a variety of colours approx 4 x 4 inches each - Cut out each alphabet letter from a contrasting colour to the background squares - Carefully sew or glue each letter to it's square and place in order in rows of 5 - Sew the letter squares together in rows of five with the Z square separate - If you have one thick piece of fabric for the back, then hem round the edges, if you have 2 thinner pieces, then sew them together inside out leaving a small gap to turn the right way round. Stitch gap closed once it is right sides out. - Take your background piece of fabric and arrange and pin the rows evenly spaced with the Z at the very bottom. - Sew each row on as if it were one long pocket, then sew in between each letter, making sure to leave the top of the pockets open - Sew the Z pocket on at the bottom - Cut your ribbon into 3 pieces and make into 3 loops - Sew the ribbon loops on securely at the top of your big fabric, one at each side and one in the middle. - Cut lots of little pieces of paper or card and have fun with your little one drawing things which begin with each letter to put into the pockets 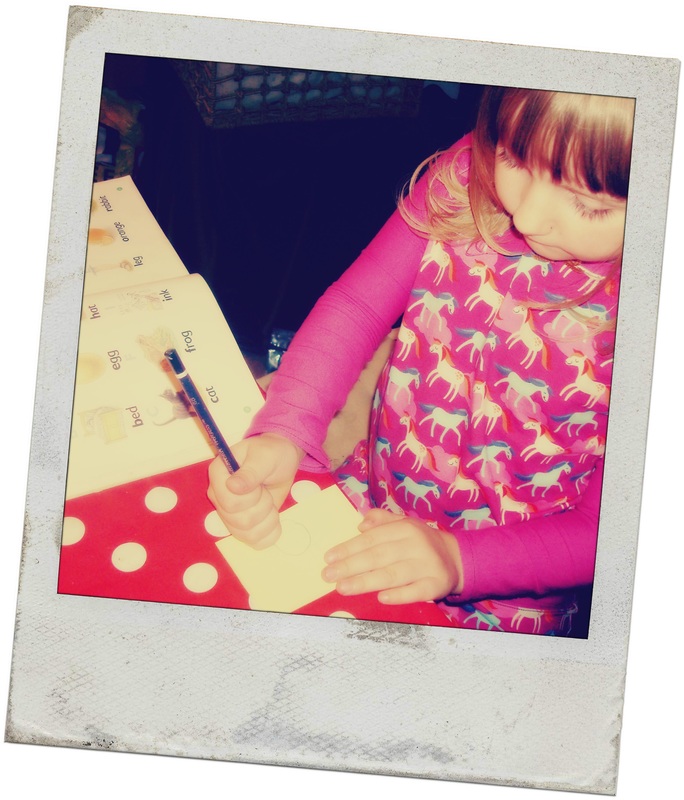

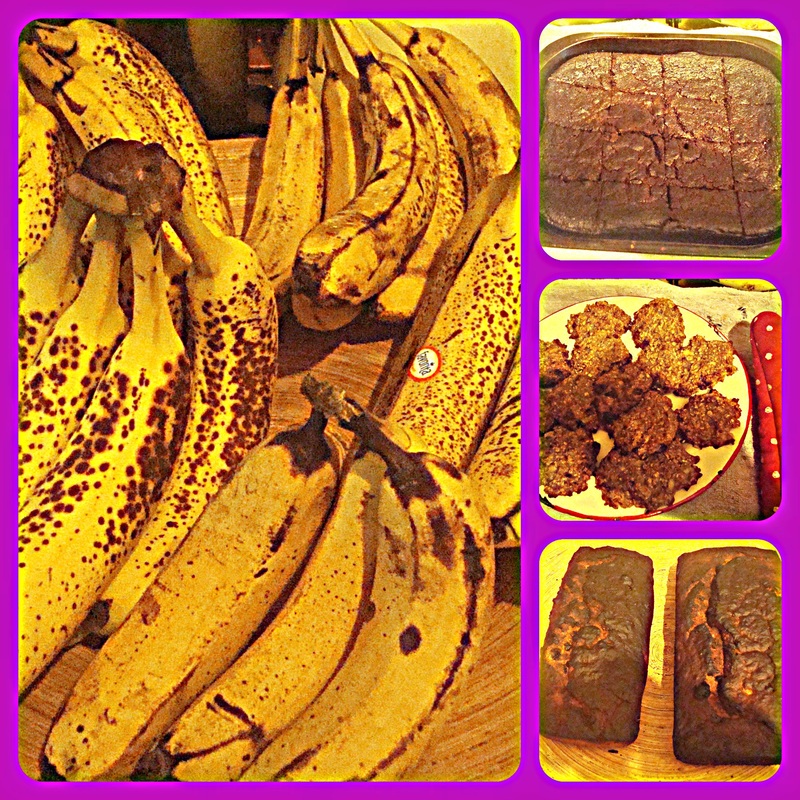
We were gifted several bunches of bananas by a friend yesterday, so today I have had a bananarama baking sesh! I made chocolate banana brownies, oaty banana bites and banana loaves. So without further ado, here are the recipes.
CHOCOLATE BANANA BROWNIES WHAT YOU WILL NEED: - 6 tblsp butter - 3/4 cup chopped dark choc - 2 ripe bananas -1 tsp vanilla extract - 1/2 cup honey - 1 tsp baking powder - 1 egg - 1/4 cup cocoa - 1 cup spelt flour WHAT TO DO: - Preheat your oven to 200 degrees c - Gently heat the butter and dark choc in a small saucepan over a low heat till melted, stirring constantly, then set aside to cool - In a bowl, mix the flour, cocoa and baking powder. - In a separate bowl, mash bananas, honey, vanilla and egg - Add butter and choc mix to banana mix and blend together - Add wet ingredients to dry and mix all together - Pour batter into a greased tin and bake for approx 20 minutes. You want it to be slightly gooey. - Leave to cool then cut into slices and enjoy with a cuppa! OATY BANANA BITES WHAT YOU WILL NEED: -5 ripe bananas -1 1/2 cups oats WHAT TO DO: - Preheat oven at 200 degrees c - Mash bananas in a bowl - Mix in oats - Form into flattish cookie shapes on a greased baking tray - Bake for approx 15 mins BANANA LOAF WHAT YOU WILL NEED: - 3 bananas - 3/4 cup honey - 1/4 cup coconut oil - 1 egg - 1 3/4 cup spelt flour - 1 1/2 tsp baking powder - 1/4 tsp bicarb of soda - 3 tsp cinnamon - 1/2 cup sultanas - 1/2 cup chopped pecans or walnuts WHAT TO DO: - Preheat your oven to 200 degrees c - Mash bananas in a large bowl - Add egg, honey and coconut oil to the bananas - Add rest of ingredients and mix well - Oil loaf tin with coconut oil and pour in mixture - Cook for approx 50 minutes or until a toothpick comes out clean - Allow to cool then turn out onto a cooling rack 
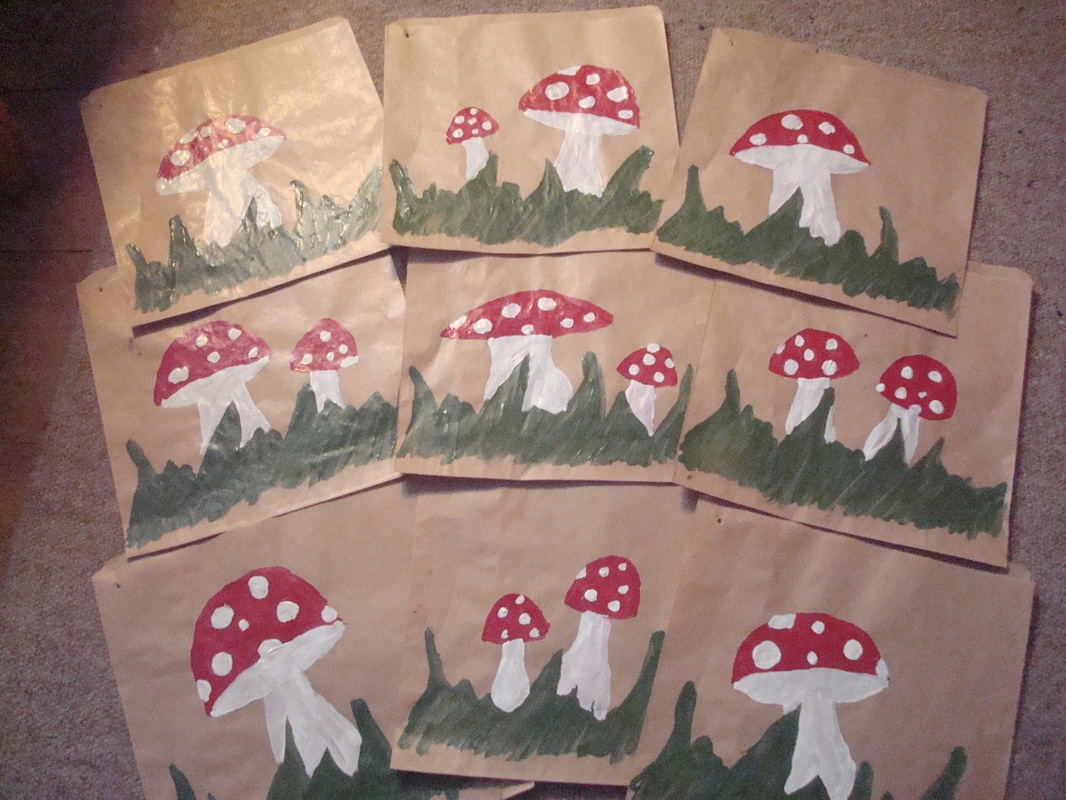
I don't usually do party bags for my kid's parties, but as my girl asked for a fairy craft party, I couldn't resist getting a bit crafty myself and painting these cute little toadstool themed party bags! You could paint anything, a skull and cross bones for a pirate party, glittery rainbow's, hearts and stars, the limit is your imagination! Everyone loved these and needless to say they were much cheaper and more eco than mass produced plastic ones.
WHAT YOU WILL NEED: - small paper bags - acrylic paint WHAT TO DO: - Decide on your theme and paint and glitter to your heart's content! 
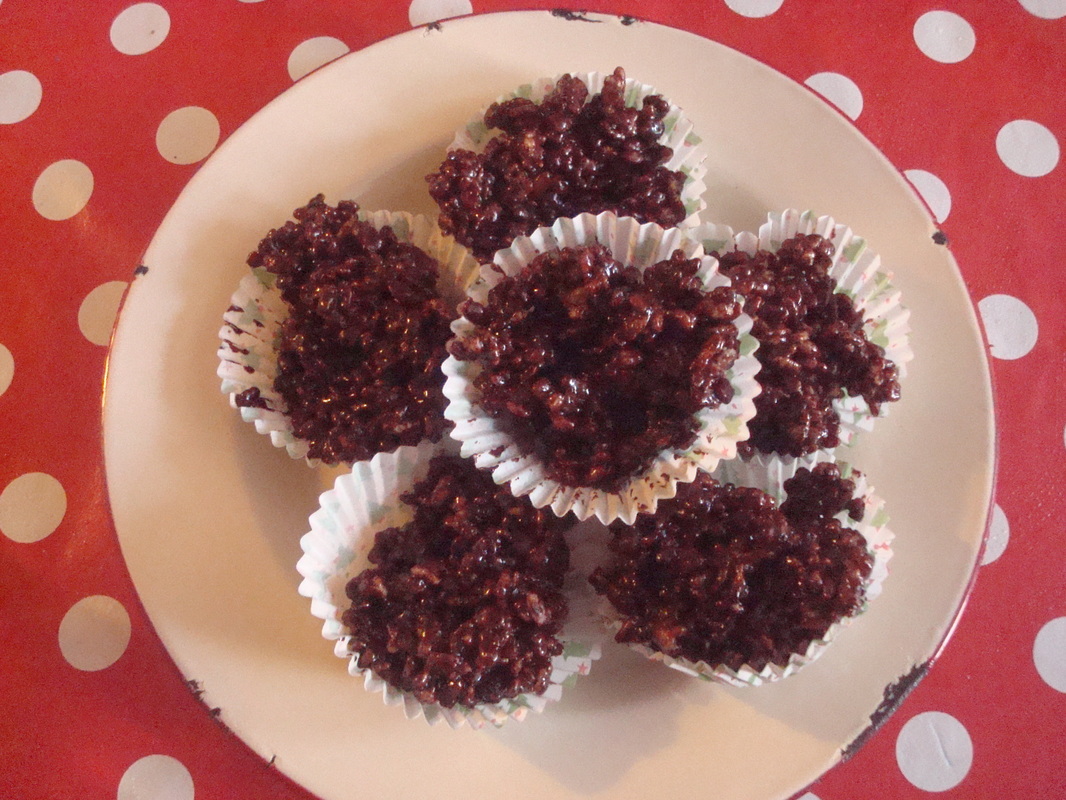
Super quick to make, sweet and delicious and no sugar or dairy! My kids love making crackle cakes and here is a fairly healthy version for you and your family to enjoy!
WHAT YOU NEED: 4oz coconut butter 4oz honey 6 tblsp cocoa 4oz rice crispies or cornflakes paper cupcake cases WHAT TO DO: - Melt coconut butter over a low heat - Stir in honey and cocoa - Mix rice crispies in completely - Spoon mixture into cupcake cases - Put in fridge for at least 30 minutes - Enjoy your tasty treat! 
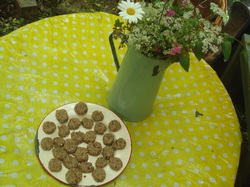
I know I have already posted this recipe on my raw recipes page, but as the summer holiday's are here now, I thought I would share it again. These little raw cookies are so tasty, so good for you and so quick to make, they are the perfect treat to have on hand for hungry kid's and adults!
WHAT YOU NEED: 1 handful sultanas 1/2 cup soft pitted dates 1/2 cup ground almonds 1 handful walnuts 1 tsp cinnamon 1 tsp vanilla extract 1 tsp almond essence 1/2 cup raw virgin coconut oil WHAT TO DO: - Put all ingredients except coconut oil into your food processor and pulse till breadcrumby. - Place coconut oil in a bowl or metal jug and place jug into a pan of hot water. - - Once melted add to mixture in food processor and blend till a dough ball consistency is reached. (If mixture is too wet, add a bit more ground almonds. If too dry, add a tiny bit of water or more coconut oil. ) - Take small bits of mixture and roll into little balls. - Place on a plate and slightly flatten each one with your thumb. - Place in fridge and you have a delicious, healthy sweet snack on hand for the whole family, and the best part is you can whip them up in about five minutes! 
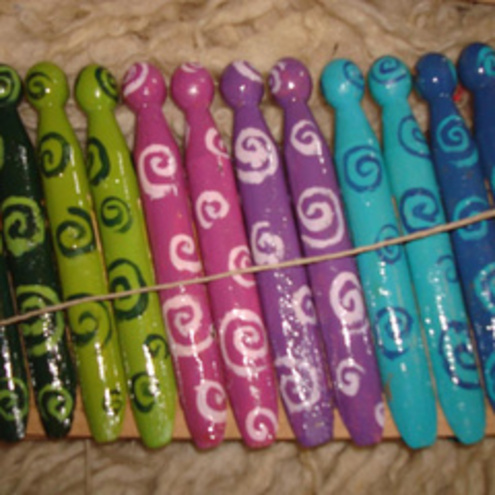
These dolly pegs make such cute gifts. I use mine mainly to seal packets of flour, lentils, coffee and stuff in the kitchen, but also to peg up my kid's artwork on a string and even to actually peg out the laundry! These are really easy and enjoyable to make, so grab your paintbrushes and lets get creative!
WHAT YOU WILL NEED: - A pack of wooden dolly pegs (very cheap on ebay) - Acrylic paints -Thin paintbrushes - Water based varnish - Strip of thick cardboard WHAT TO DO: - Lay newspaper out over your work surface - Wedge your piece of thick card to a standing position and stand your pegs along this - Paint your base colour/s onto the pegs - Once dry, paint cute little patterns onto the pegs. (My fave so far is tiny toadstools on a green background) - Once dry coat in varnish - If you are going to give these as a gift you could wrap them in a bundle with a pretty piece of ribbon and sweeten someone's day! 

This project is fab if you have a little fairy or two or three in your family! It is so quick and easy, I had to stop myself making one in every colour! You can even get sparkly glitter tulle! ( We almost made a frozen inspired Elsa tutu, but rainbows won the day in the end! ) I say ' no sew' I did sew the straps on our one, but this tutorial is for tied on ribbons. The supplies are very cheap to buy on ebay and as you can see from the picture, you can create a magnificent tutu for your own little fairy!
WHAT YOU NEED: - a stretchy 'crochet tube top headband' ( Copy and past the link below into your browser ) http://www.ebay.co.uk/itm/Tutu-supplies-crochet-tube-top-headband-sz-1-5-6-9-10-or-12-inches-/370837030131?pt=LH_DefaultDomain_3&var=&hash=item56579c04f3 -approx 3 metres of tulle netting -1 metre of wide satin or lace ribbon WHAT TO DO: - First tear your tulle into strips approx 4-5 inches wide -Decide how long you want your tutu to be and cut the strips to that length x 2 plus about 3 inches. - Now stretch your crocheted bodice round something like a paint tin that will stay upright while you rotate your work. ( My girl was so excited about the imminent tutu that I actually made the tutu on her! ) - Take the first strip and tie onto the bottom of the bodice. ( I did this by folding the strip in half, feeding the fold through, then posting the two loose ends through the loop and pulling tight) - Continue all the way round tying strips as close together as possible. - For an extra fluffy tutu tie another whole layer above the first one. ( We made an under layer of white tulle and a top layer of rainbow colours. ) - Now cut you ribbon in half, put the tutu on your girl and tie the ribbon shoulder straps on in the best position for her. If you like you can tie each ribbon onto the front , then lay over the shoulders, then thread through the back near the middle and tie in big bow in the centre. - Now simply trim the straggly ends of tulle all to the same length and you are done! A simple, yet fabulous addition to any girl's wardrobe! 
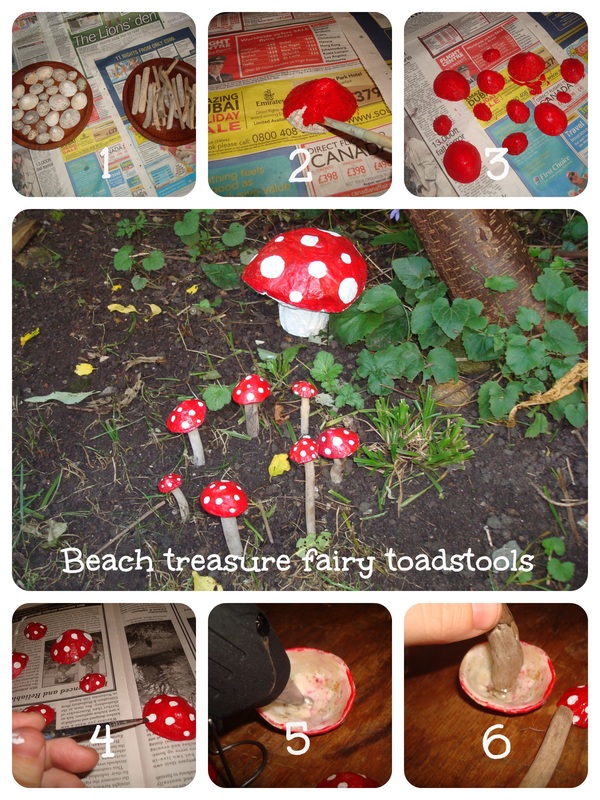
How many people return from the beach with pockets full of shells and driftwood and then end up with boxes of dusty beach treasure never looked at again? This project will get some of that treasure fairy blinged up and out on display with your very own fairy ring at the bottom of the garden! (You do need a hot glue gun to make this, I borrowed one from my friend but you can pick them up quite cheaply on ebay too.)
WHAT YOU WILL NEED: -Limpet shells -small driftwood sticks -acrylic paint -Hot glue gun -varnish (optional) WHAT TO DO: 1) Lay out your shells on a piece of newspaper 2) Carefully paint all your shells in red or any colour you want your toadstools to be 3) Do a second coat when the first is dry 4) Paint on white spots all different sizes 5) Heat up your glue gun an put a big blob in the centre underside of your shell 6) Press a piece of driftwood onto the glue blob and hold till it dries. Repeat with all your shells When you are done, you can either make a fairy ring in the garden, or simply decorate your indoor plant pots with cute little toadstools! 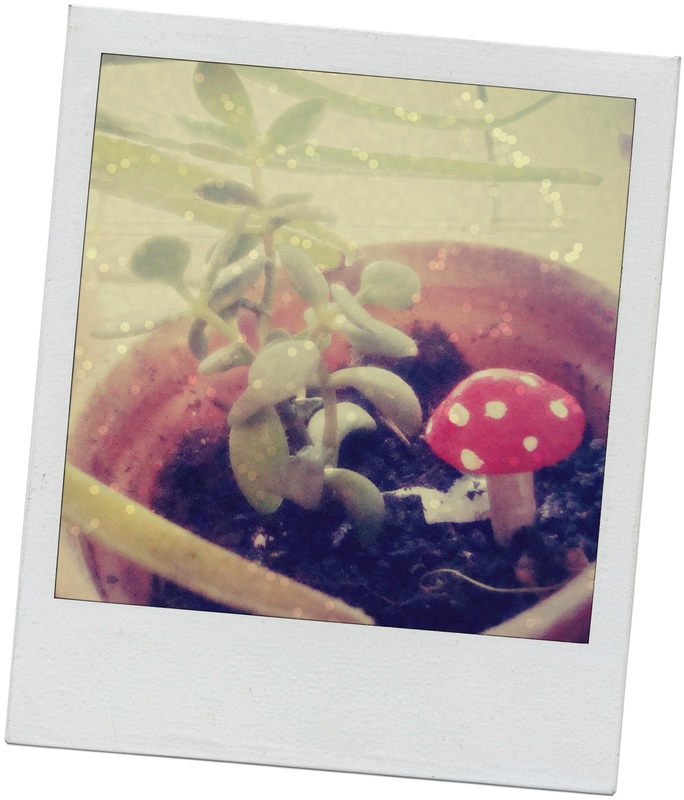

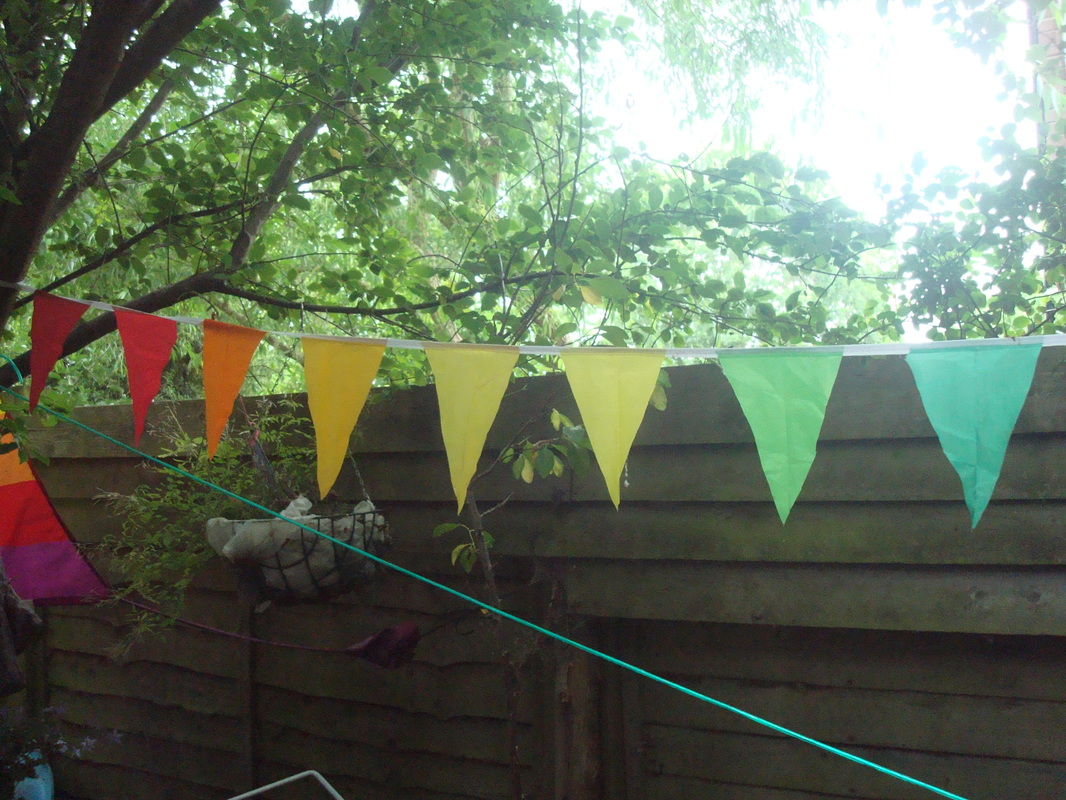
This simple project will brighten up any outdoor space, and due to it being made of umbrella fabric, it is completely weather proof too! I had a gorgeous big rainbow umbrella, but after a while it inevitably got blown inside out. I couldn't bring myself to throw it out, even though it was trashed, and then inspiration struck! Outdoor bunting! Yey!!!
WHAT YOU WILL NEED: - A long piece of ribbon -An old broken rainbow ( or other bright and pretty ) umbrella -Sewing machine ( optional, you can also sew this by hand) - Pins -Old cereal box, pen and scissors WHAT TO DO: - Make a triangular bunting flag shape from your cardboard and cut out - Draw around your template on each colour of your rainbow and cut out flags - Pin the flags to your ribbon spaced a few cm's apart - Sew flags on in one long uninterrupted line of stitching, securing thread at each end -Tie a loop in each end of your ribbon and hang somewhere nice -That's it! You're done! 
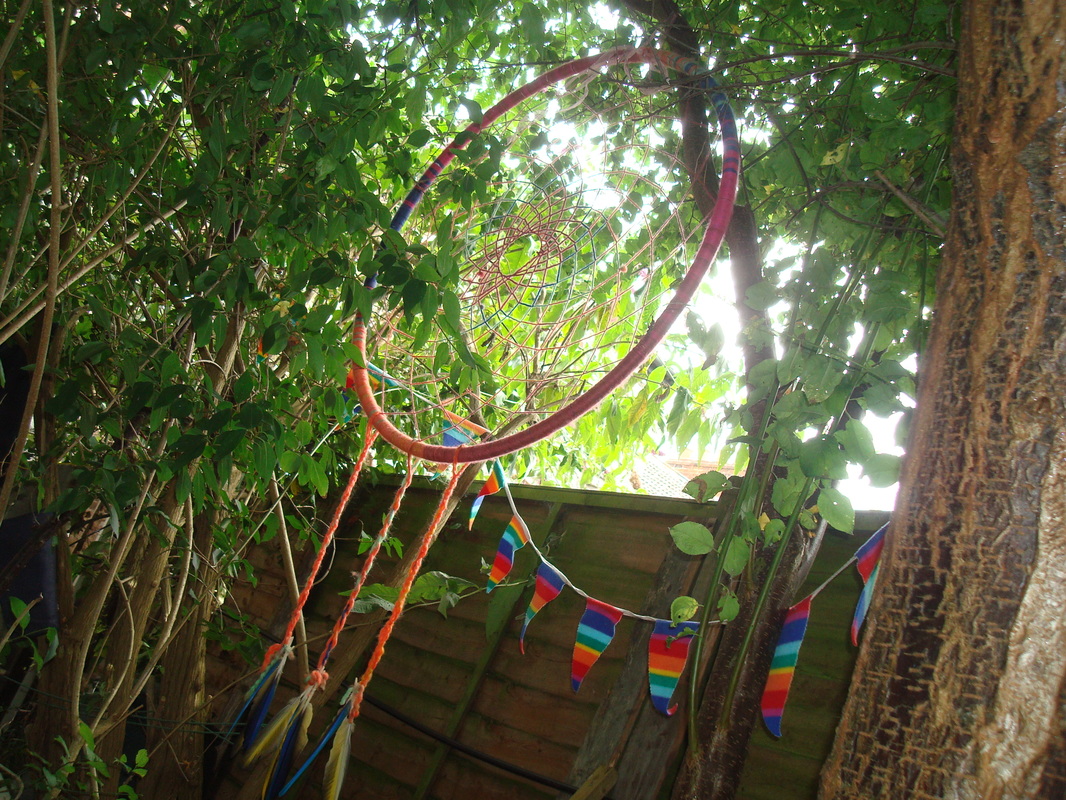
Do you, like me, have a hula hoop staring accusingly at you from across the room? Did you, like me, have great intentions of learning all kinds of hula hooping tricks and getting a trim tummy from all that hooping, only to find you spent a lot more time watching other people doing said tricks on youtube than actually picking up your hoop? Then this is the blog post for you.
Turn that hula hoop into a fabulous garden art installation instead! You will feel joy every time you look at it instead of annoyance! WHAT YOU WILL NEED: - 1 hula hoop - 1 or 2 balls of chunky, colourful yarn - A few big feathers and beads WHAT TO DO: - Begin by wrapping yarn tightly round the whole hoop to hide the plastic, and tie in a secure knot at end - Now attach the end of your yarn ball and wrap following the below instructions: 
-Click the button above to visit the site I got this picture from, they have great written instructions and a lovely dream catcher legend too.
- Once you get to the middle, fasten off your yarn securely - Now make 3 long plaits and tie them to the bottom of the dream catcher a few inches apart -If you like you can thread big beads onto these plaits now - Tie or sew a big feather to the bottom of each plait. -Now tie a loop to the top so you can hang it up - All that remains is to hang your beautiful creation up in a tree or somewhere in your garden or a friend's. 
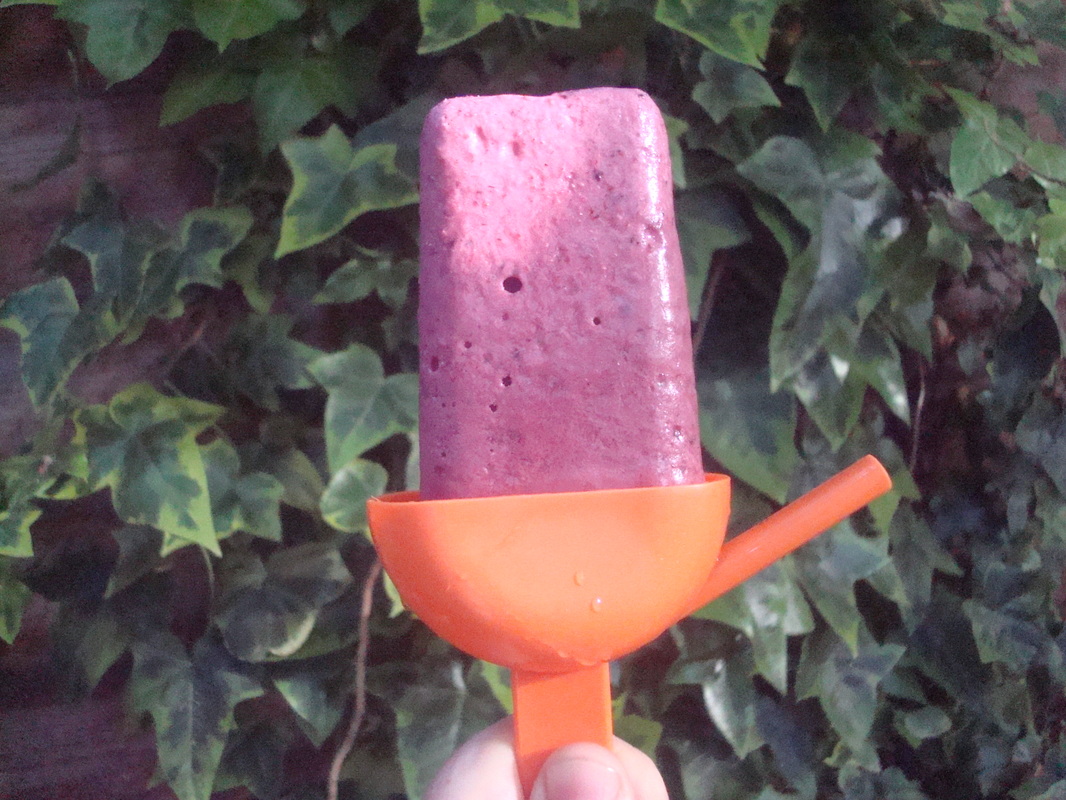
My kids and I love a particular coconutty frozen treat from the wholefood shop, but they are very small and very expensive, so I decided to see if I could create my own version with no sugar at home. The experiment was a success! Here I have used frozen berries, but another time I used pineapple juice instead and that was also LUSH!!!
WHAT YOU NEED: -1 tin coconut milk -1/2 cup honey ( or sweetener of your choice) -2 cups frozen berries ( or fresh fruit or 1 cup of fruit juice) -Blender -Lolly molds -Freezer WHAT TO DO: - Put coconut milk, honey and fruit into blender and blend till smooth and creamy -Pour into lolly molds -Put into freezer -Wait a few hours or over night and enjoy with your children! These have to be tasted to be believed! They are super super lush with a cherry on top!!! 
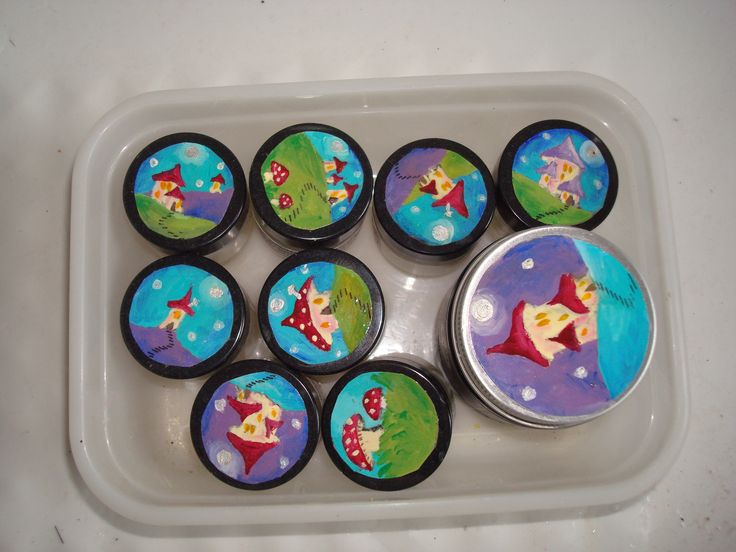
This gorgeous balm is fantastic for just about any skin complaint. I find it is the only thing that soothes the eczema on my hands, it is perfect for bites, stings, sunburn, bruises, sore bits, nappy rash, cuts etc... There are simply three ingredients and it smells gorgeous too!
I really enjoy making cute little labels for the pots and giving them as gifts too. WHAT YOU WILL NEED: -Coconut butter -Tea tree essential oil -Lavender essential oil -Small glass jar/s WHAT TO DO: -Put enough coconut butter to fill your jar/s into a glass or metal jug and place in a pan of simmering water till melted -Add in approx 20 drops each of lavender and tea tree oils and stir well -Carefully pour into your jar/s and put on the lid/s. -Place in fridge to solidify That's it! So simple and such a wonderful thing to have in your medicine cabinet. 
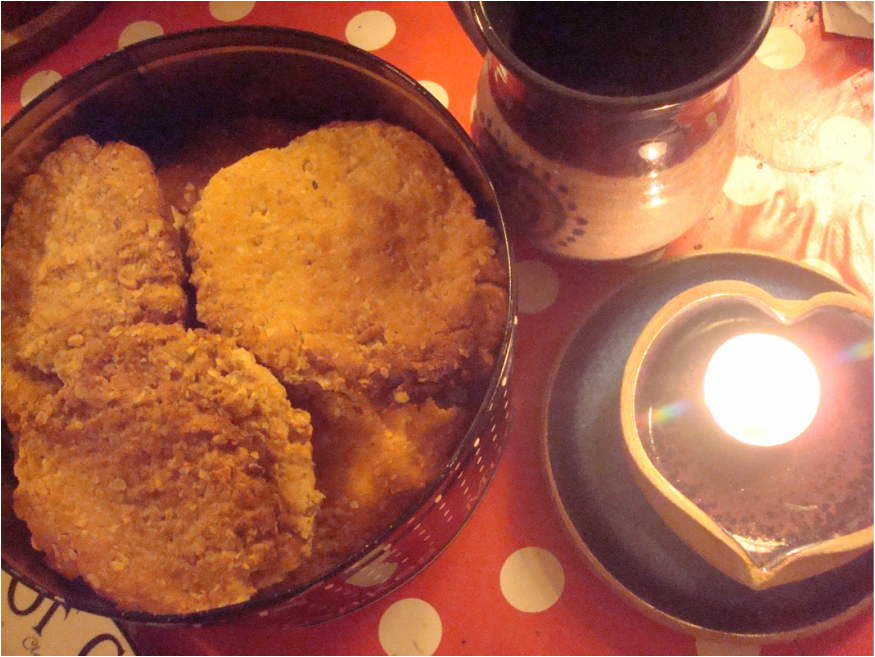
This recipe is a favourite cookie recipe of ours, but using honey instead of sugar and spelt flour instead of wholemeal. They are really chunky and satisfying for those times when only a cookie will do! They are also super quick and easy to make.
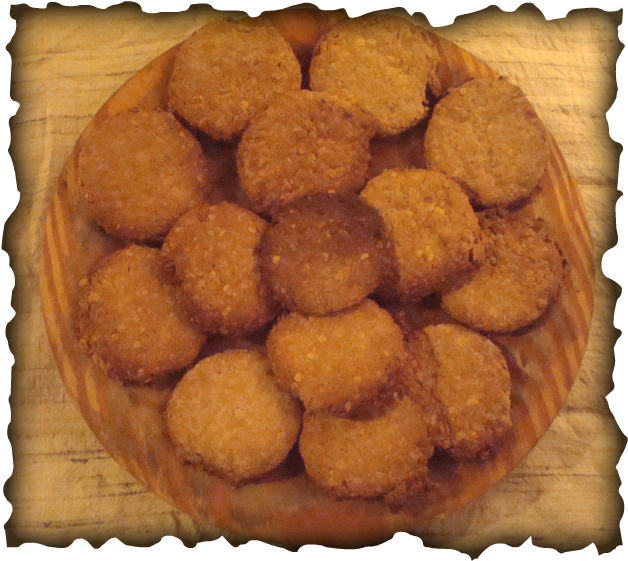
You will need:
A baking tray A round cookie cutter 4oz soft butter 3oz honey 4oz wholemeal spelt flour 4oz porridge oats What to do: - Put oven on at 180 degrees centigrade - In a bowl, mix the butter with the honey - Add oats and flour and mix well till completely blended - Grease a baking tray, then roll out mixture thinly on surface - Use you cookie cutter to cut out cookies and place onto tray ( makes about 12 cookies) - Bake for 12-15 mins - Allow to cool before serving )
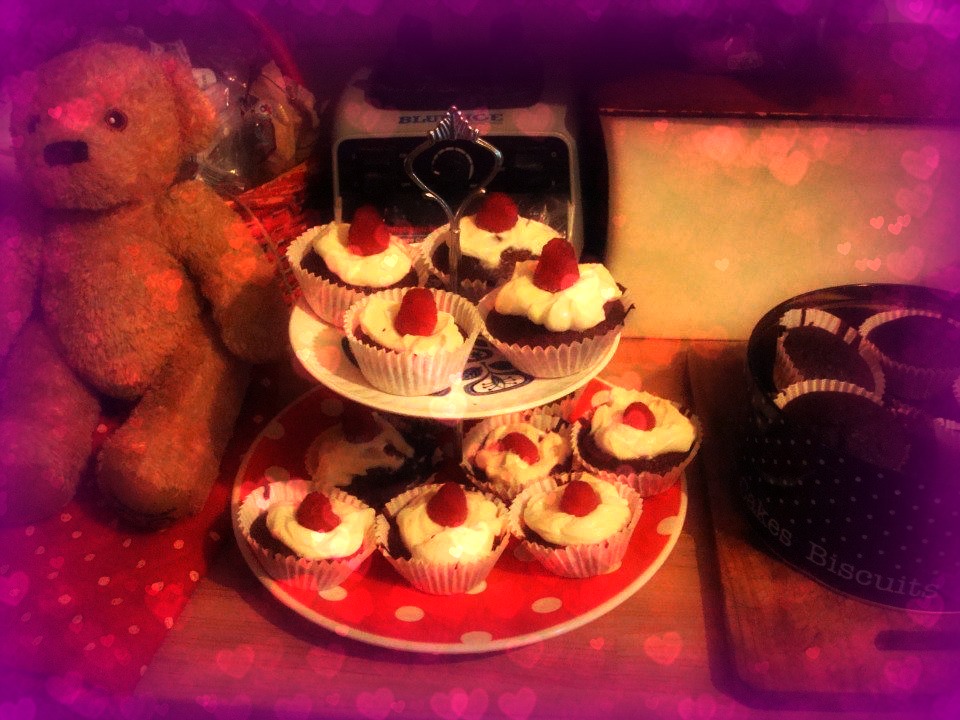
These cupcakes are so sweet and tasty, that no-one would guess they are sugar free! You can also use the mix to make a big cake too, you just need to cook it for a little longer. It makes a fantastic alternative to sugary birthday cake and produces a less hyper party of kids too!
WHAT YOU NEED:
1/2 cup cocoa 1/2 cup boiling water 1 1/2 cups sifted spelt flour 1/2 tsp baking soda 1/4 tsp salt 3/4 cup butter ( room temp ) 2 large eggs, lightly beaten 1/4 cup milk 1 tsp vanilla extract 1 cup honey WHAT TO DO: - Preheat oven at 175 degrees centigrade - Combine cocoa and water and whisk till blended - In another big bowl, combine flour, baking soda, salt and honey - Mix soft butter into flour mix - Add eggs, milk and vanilla to cocoa mix and whisk till smooth - Add cocoa mix to flour mix and whisk together till smooth - Spoon into paper cases and bake for approximately 20-25 mins or until a fork comes out clean - Top with frosting of your choice. I have used a small tub of cream cheese mixed with 1/3 cup honey and a dash of vanilla extract and topped each one with a raspberry- yummy! 
WHAT TO DO:
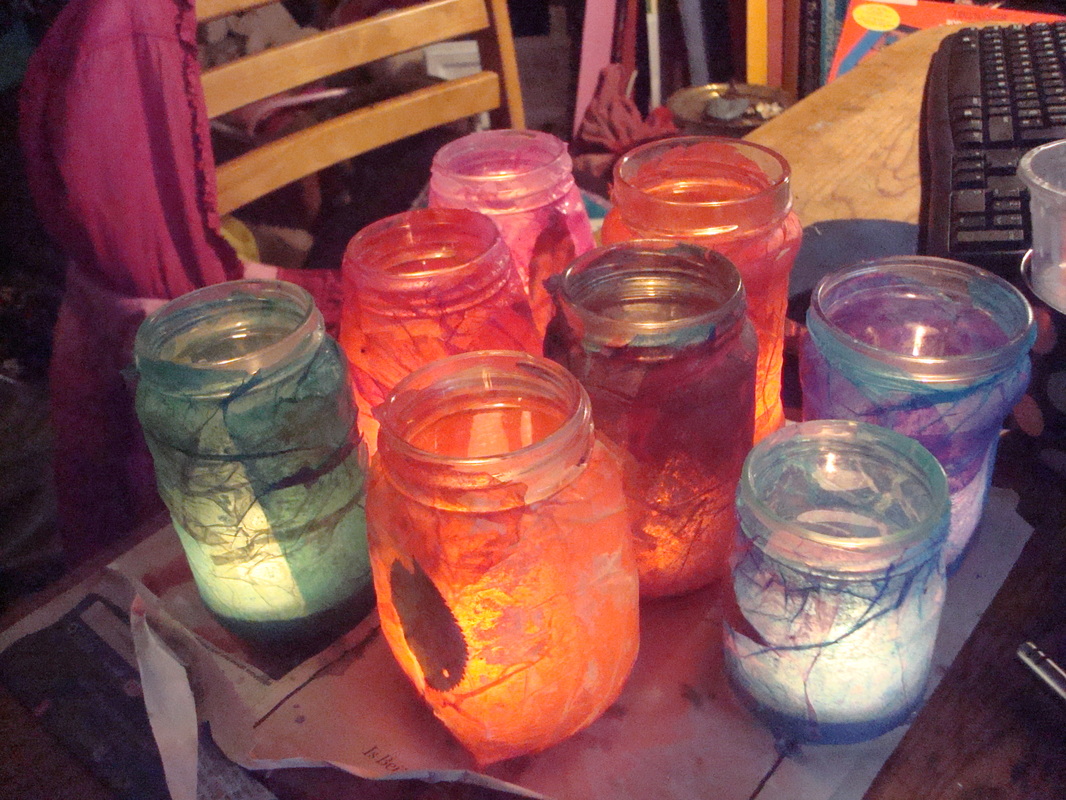
* Lay out some newspaper and set out jars * Cover your jars in a thick layer of glue * Rip tissue paper into strips roughly the height of you jars and press onto the gluey surface, cutting or ripping excess paper off * Glue a leaf to the front of each jar * Cover whole jar in glue again and stick on another layer of tissue paper. This looks great if you use a different colour for the top layer. * Cover the whole thing in a final thin layer of glue to seal it all in * Wait for jars to dry, then place a night-light in each one and marvel at your beautiful creations! NOTE: Never leave a lit candle unattended. 
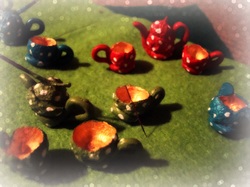
Today I am going to share with you how to make these little fairy tea sets from acorns for the little fairy or fairies in your life!
WHAT YOU WILL NEED: Some acorn cups milliput ( air dry modelling clay) Acrylic paints Non toxic varnish WHAT TO DO: *Spread out some newspaper and lay out all your acorn cups *Get some milliput soft in your hands, then make tiny sausages for cup and teapot handle's and a tiny spout for your teapot *Make a small disk for the base of each cup and the teapot and push each one down gently onto it's base so they all stand up properly. *Press handles onto the side of your acorn teacups and teapot, carefully molding into the shape you want. *Do the same with the teapot spout on the opposite side from the handle. *Wait for clay to dry before painting the outsides whatever colour you like then wait to dry *Now paint the insides, I have gone for gold as it looks extra magical. *When the paint is dry, apply a coat of non toxic varnish Now present to a little fairy and let the fun begin! NOTE: This tea set is is not for actual liquids, just imaginary fairy juice! 
|

Arisha's Inspiration CornerHi there, I am Arisha. Thanks for stopping by my little corner of inspirations! I LOVE making things. This blog is a place for me to share with you, lots of lovely things to make and do including: Subscribe below to receive each new post hot off the press direct to your email!
Archives
April 2019
Categories
|


 RSS Feed
